AirPen-UI: Training Data Acquisition Interface for Wireless Air Writing Recognition Using Motion Sensor-based Wearble AirPen
Timeline:
Work in Progress
Project Summary:
Air-written Character Recognition (ACR), leveraging accelerometric and gyroscopic
data of human hand movement measured using Inertial Measurement Units (IMUs), has
been a popular area of research for over a decade now. A challenging part of such
research lies in the collection, organization, and labelling of the data that are
required for training various ML/DL models. With the help of a UI, this project
currently facilitates accumulation of similar data pertaining to the index finger
motion generated while writing different characters of the Bangla and the English
languages in the air. These data are collected using a prototype of an Arduino-based
wearable AirPen with wireless data transmission. The UI also allows researchers to
select existing and/or define new gestures corresponding to a character for data
collection. Apart from storing the raw data as '.csv' files., the system also stores
resampled data at 512Hz.

AirPen Prototype
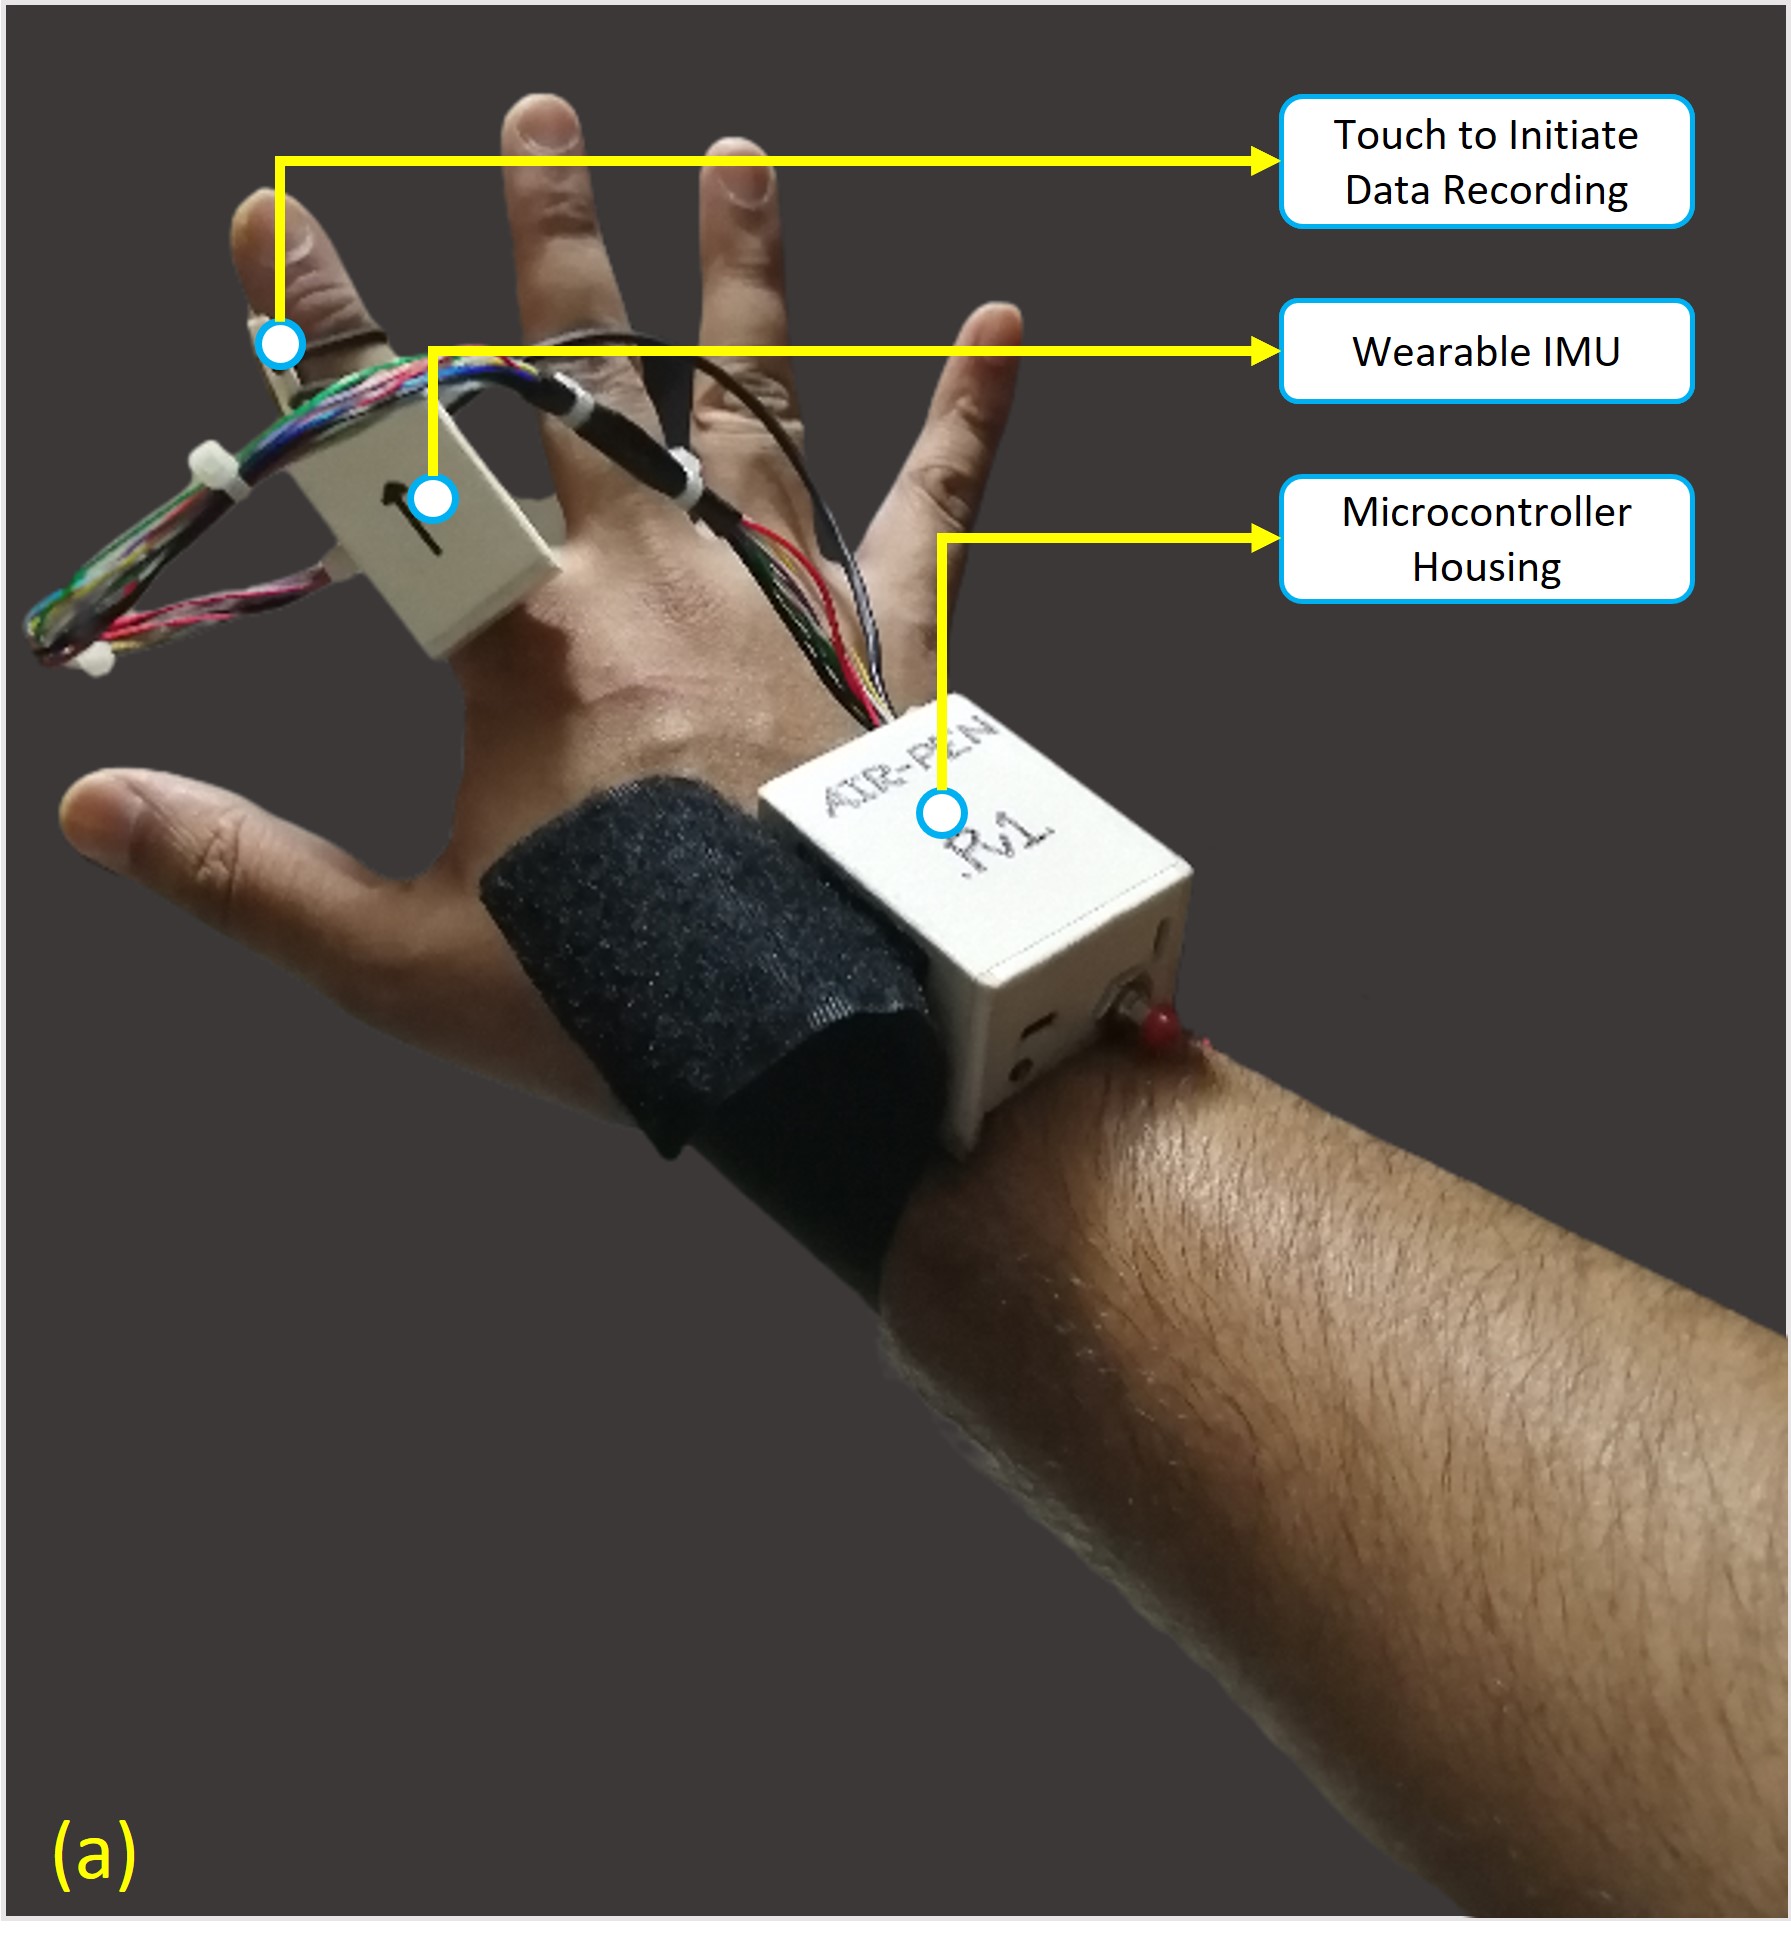
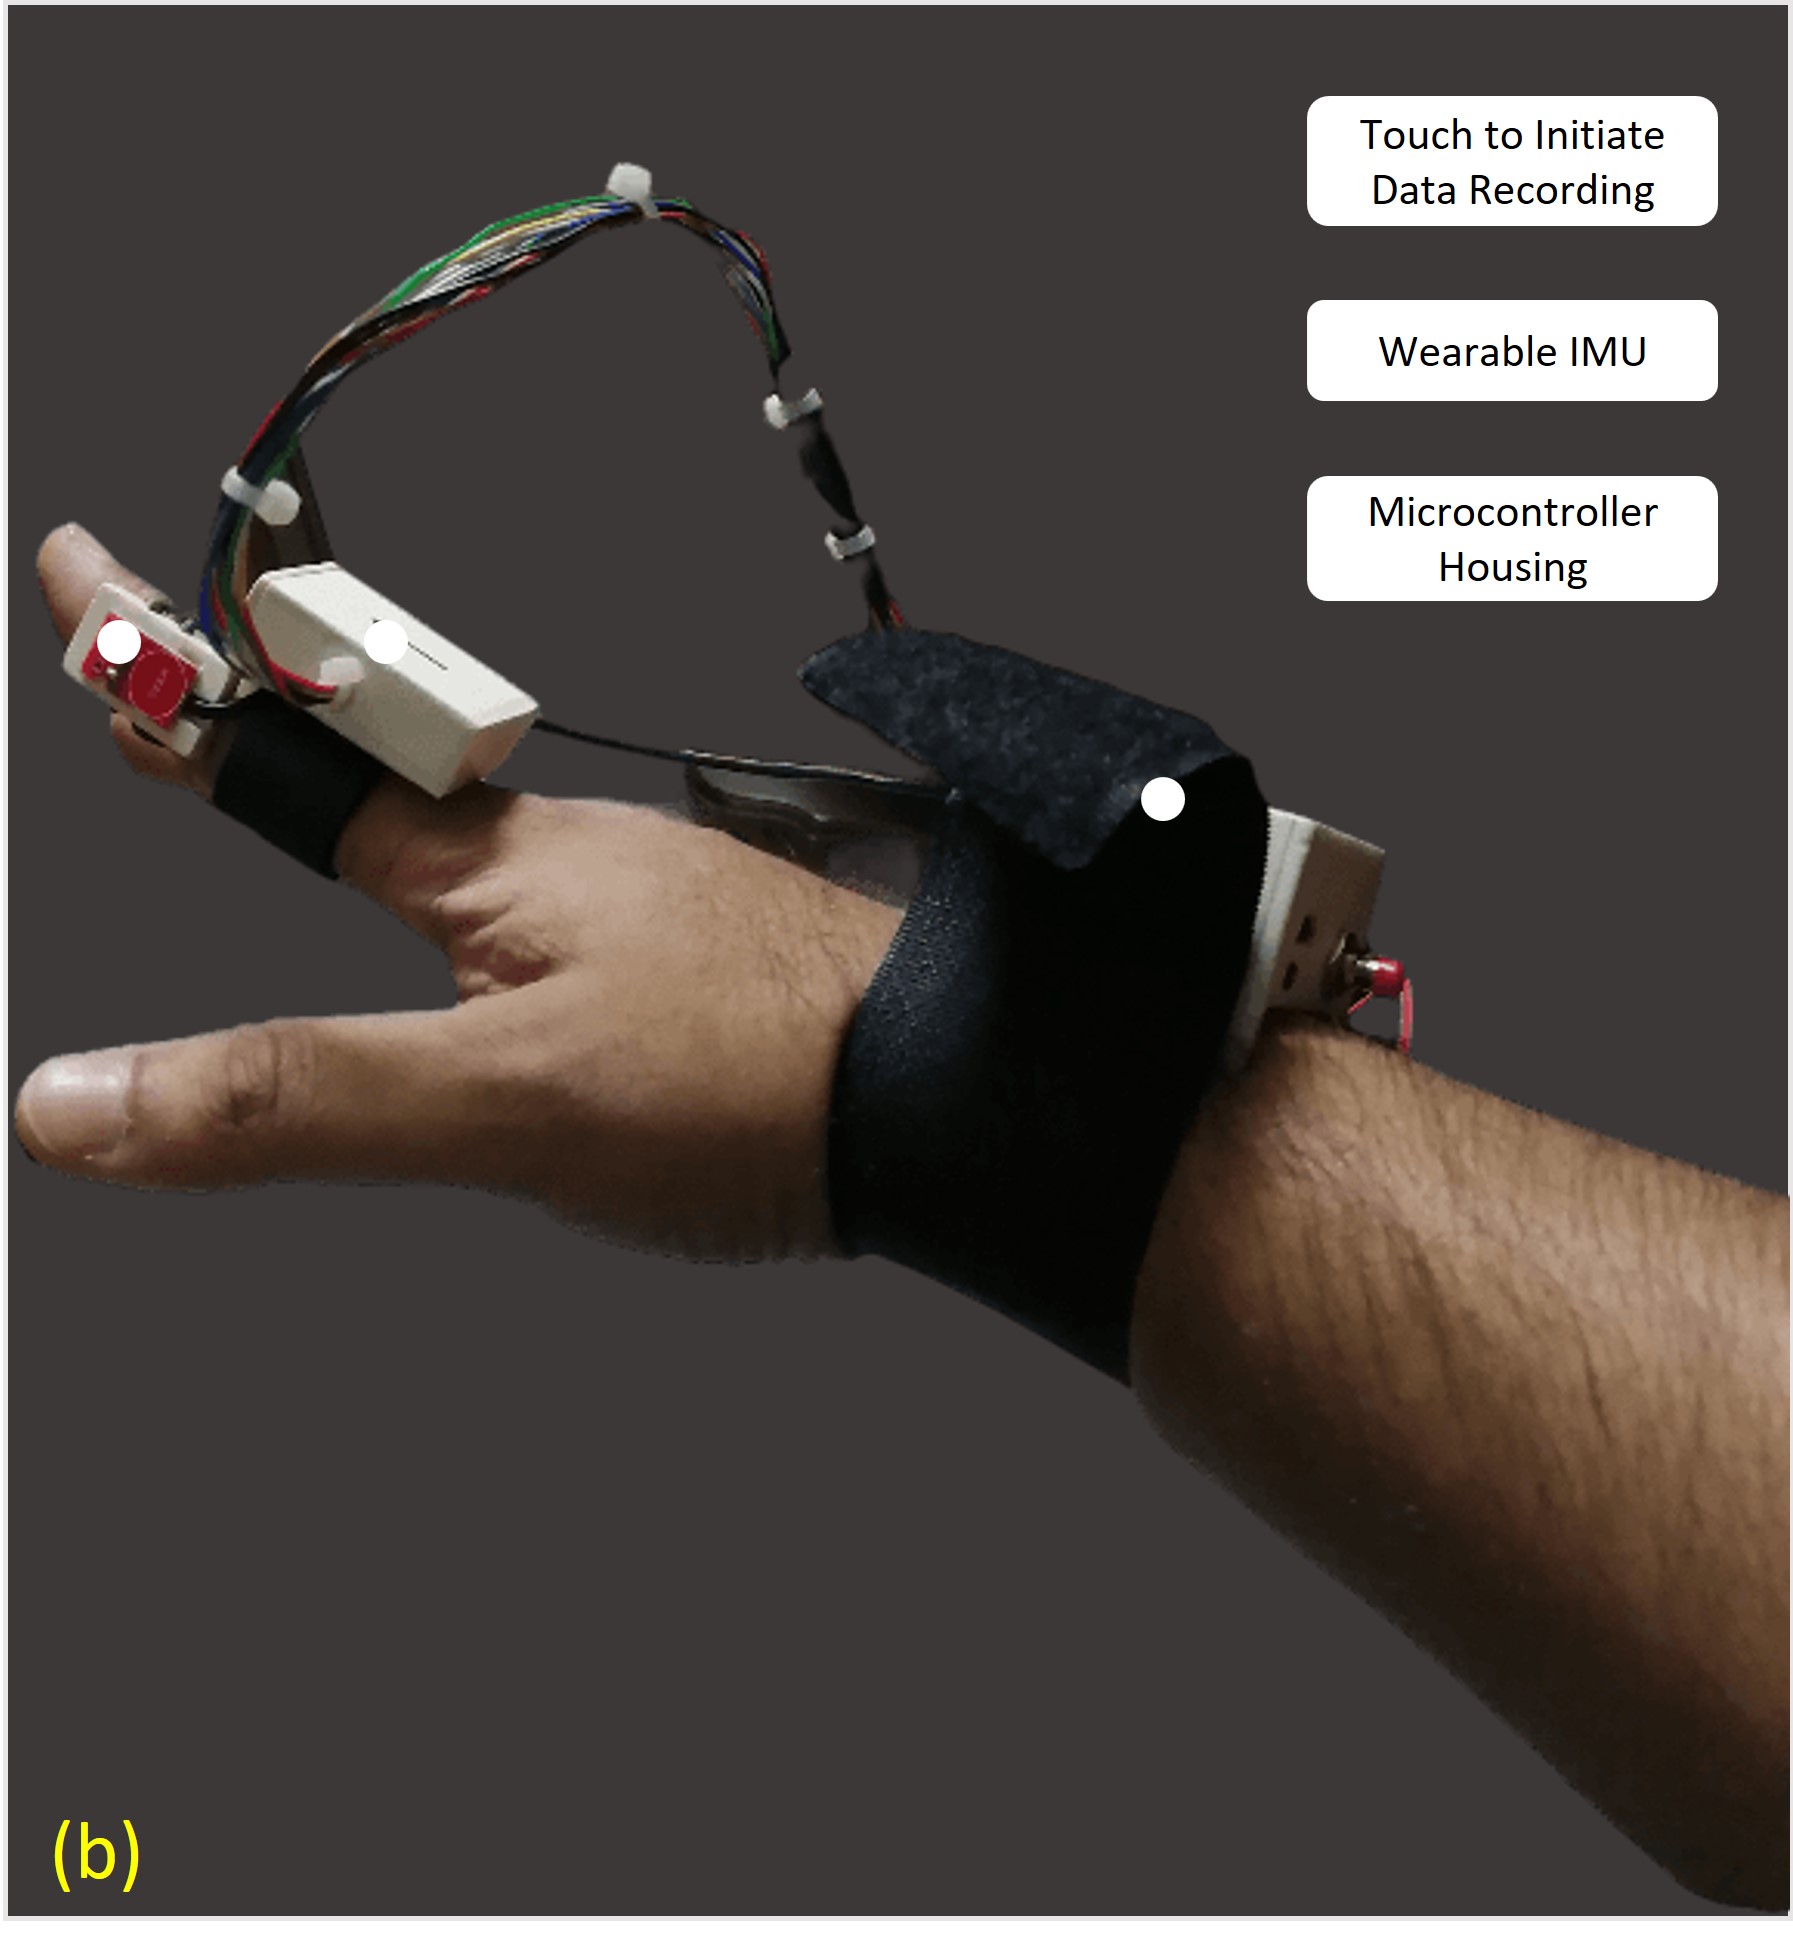
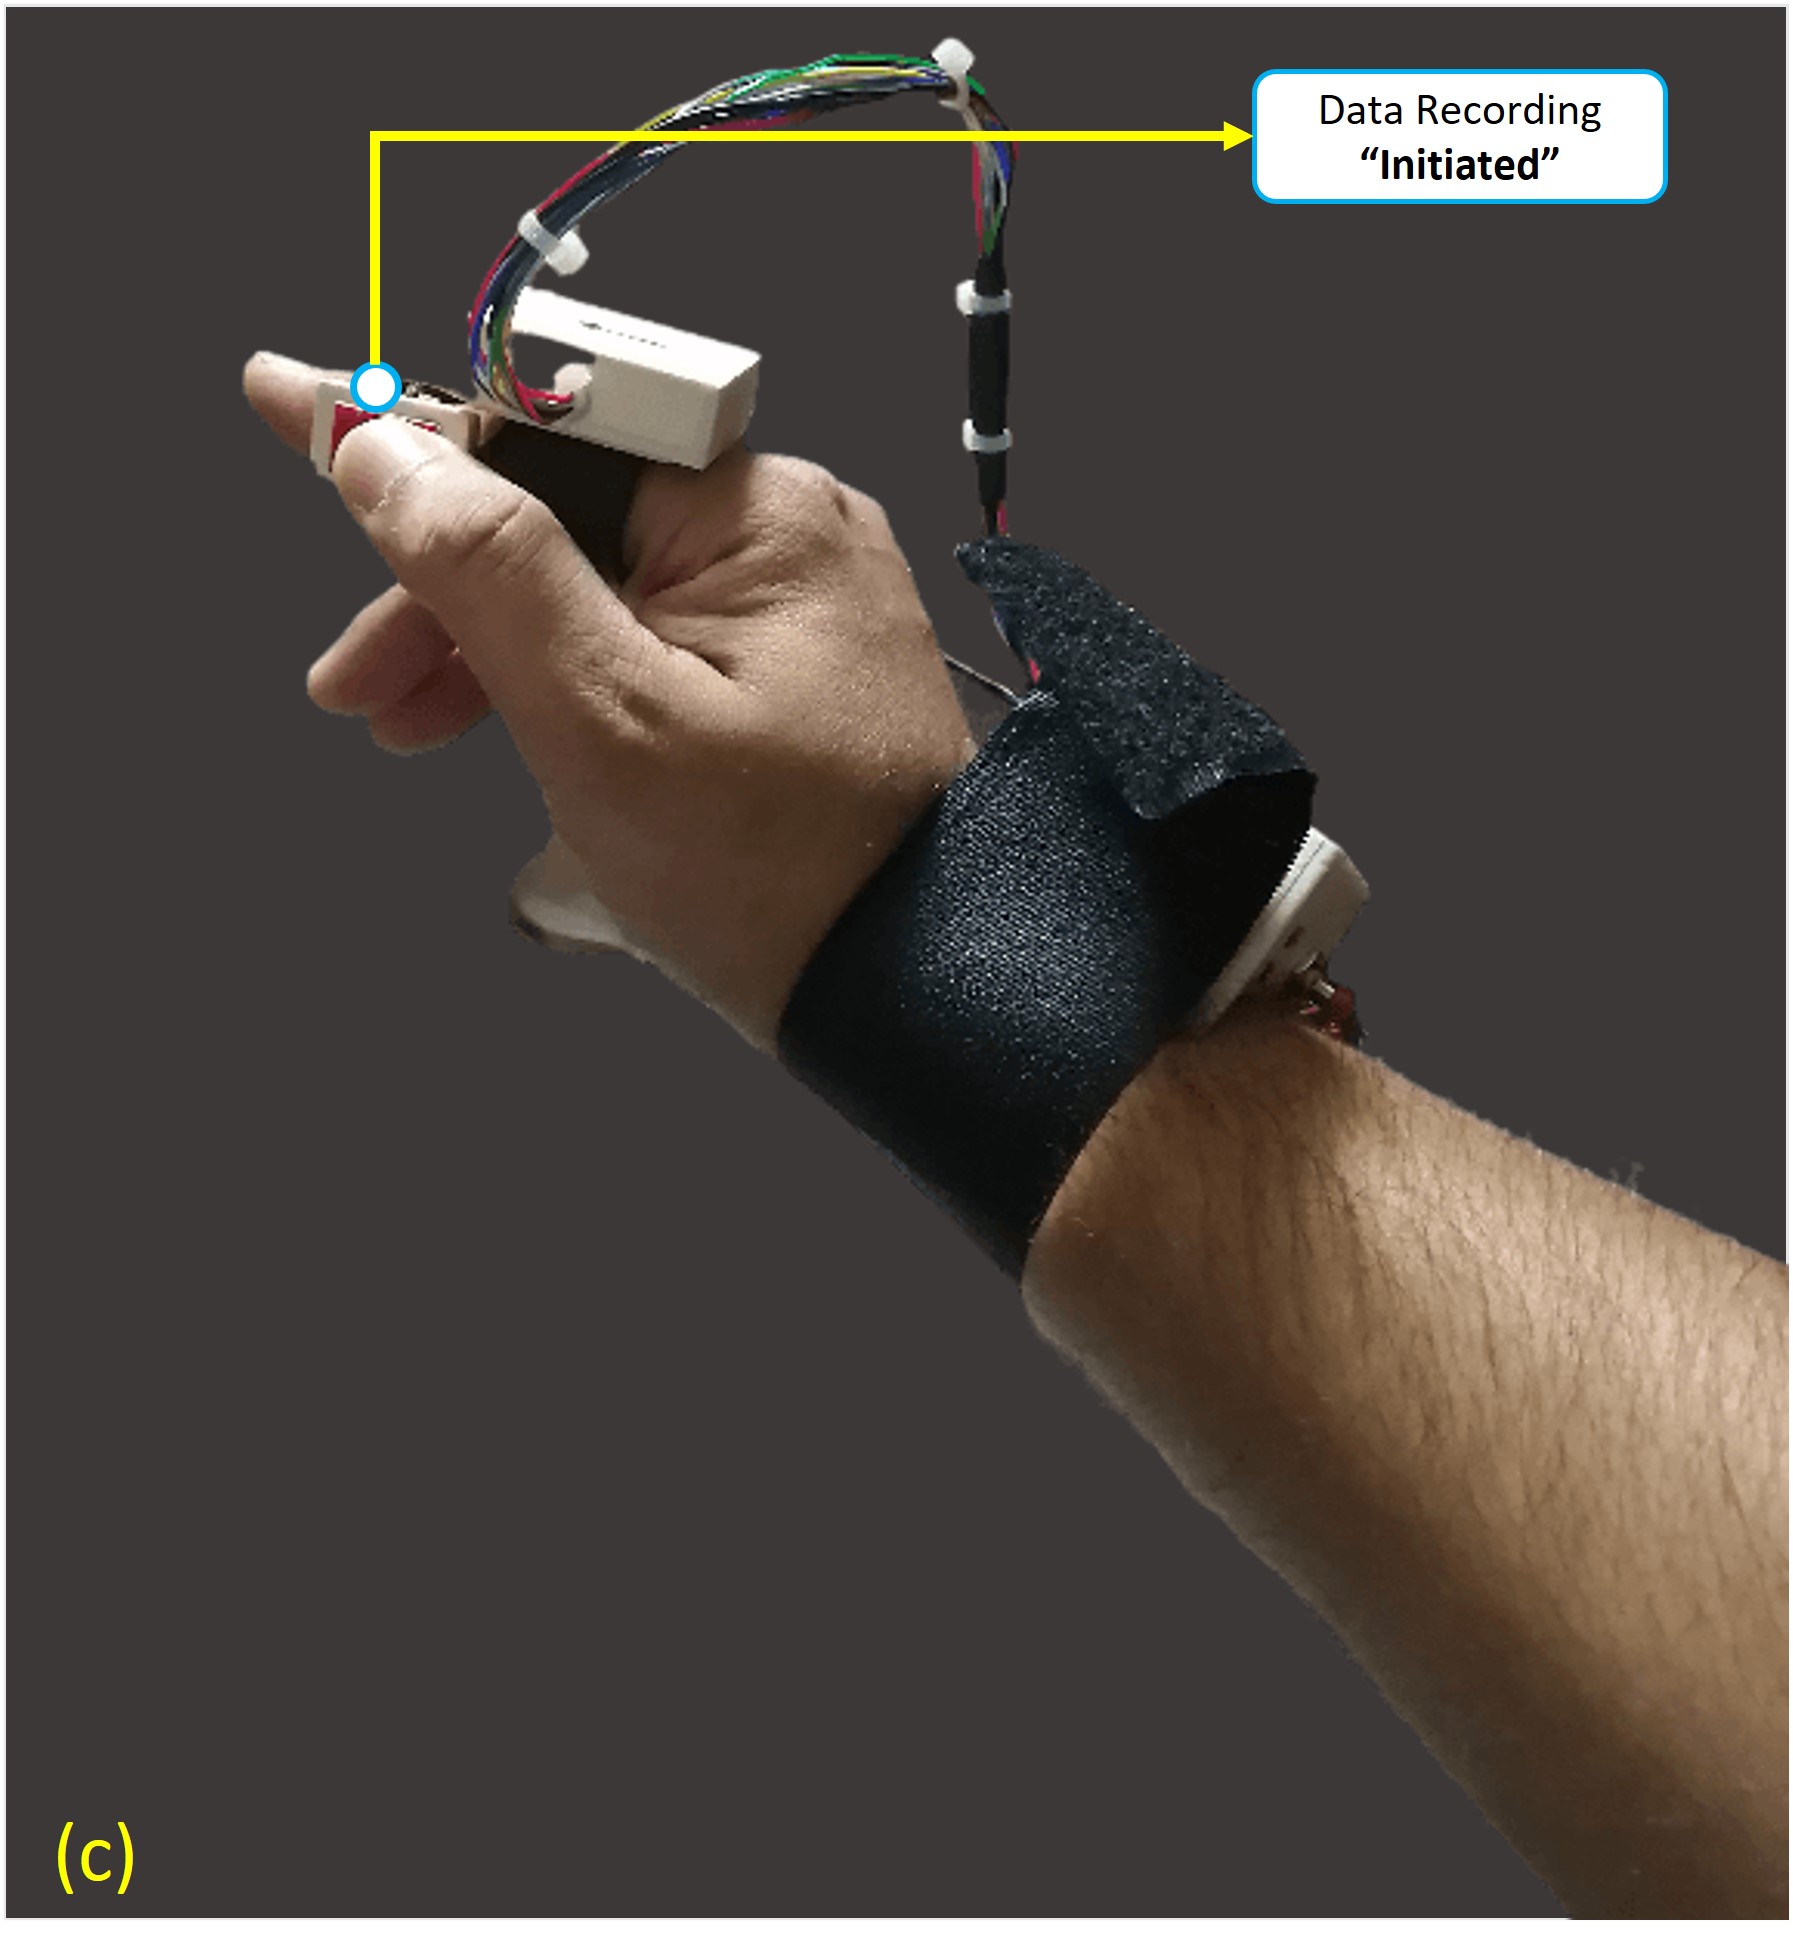

The Arduino-based wearable prototype of the AirPen [Figures (a) - (d)] features a wearable IMU (MPU6050), a wearable touchpad, and an NRF24L01+ module. The device starts transmitting motion data wirelessly to a receiver connected with the host PC via the NRF24L01+ module upon powering-up. The touchpad is used to initiate recording of hand motion data pertaining to the desired gesture [Figure (c)] at the system UI, and is stopped as soon as it is released [Figure (d)]. Subsequently, the recorded data are saved as ".csv" files. A video demonstration of using the system will be provided at the end of this repository. But first, let us try to understand the workflow of the UI itself.
Connecting AirPen with the UI
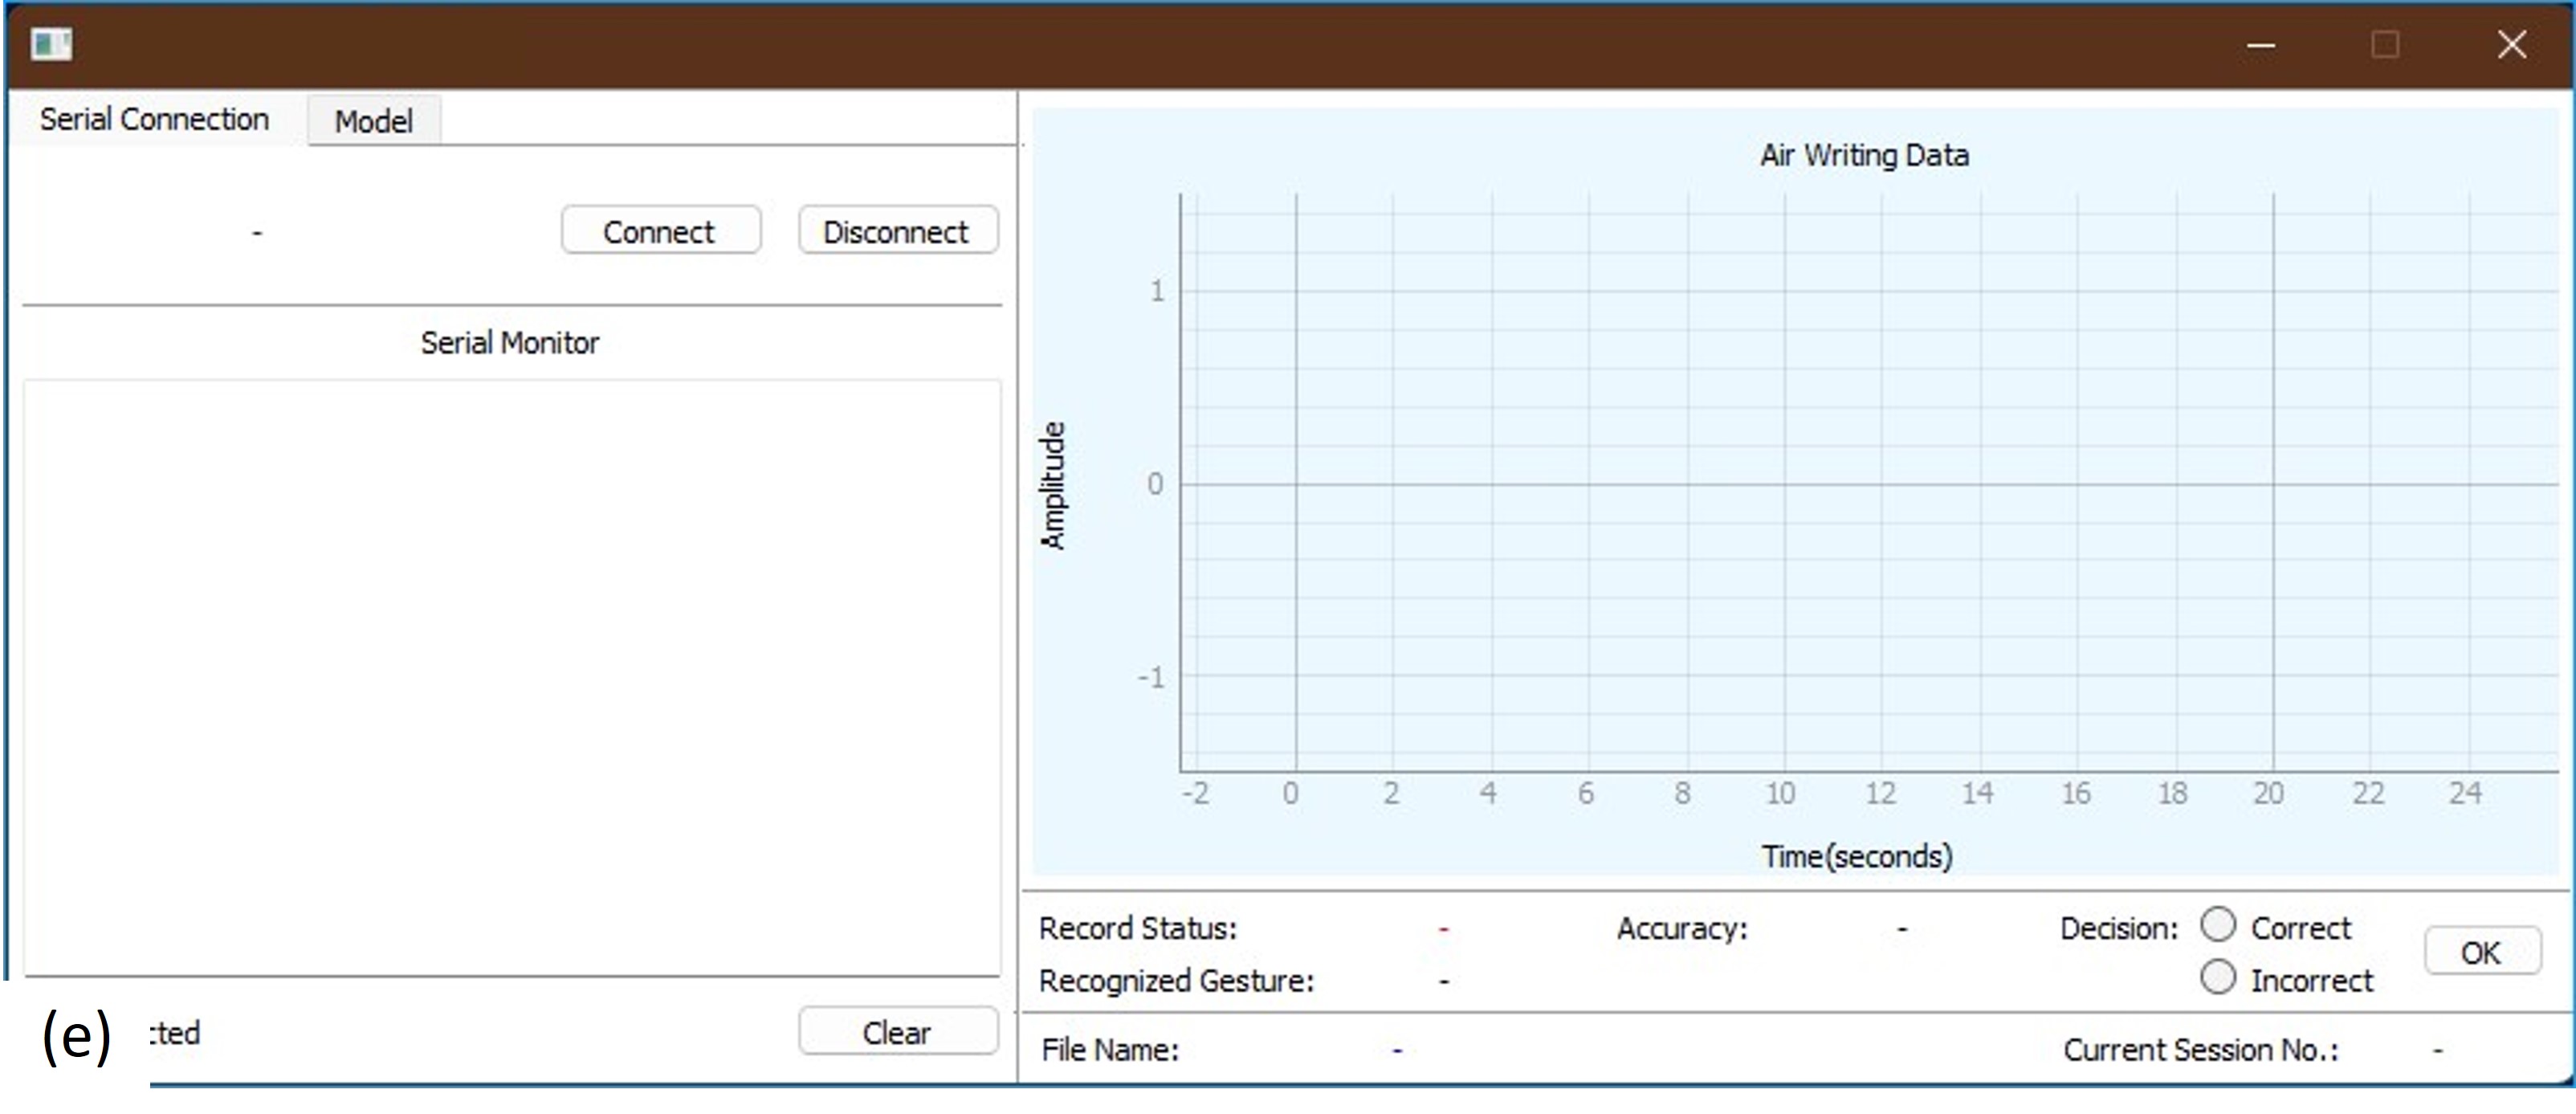
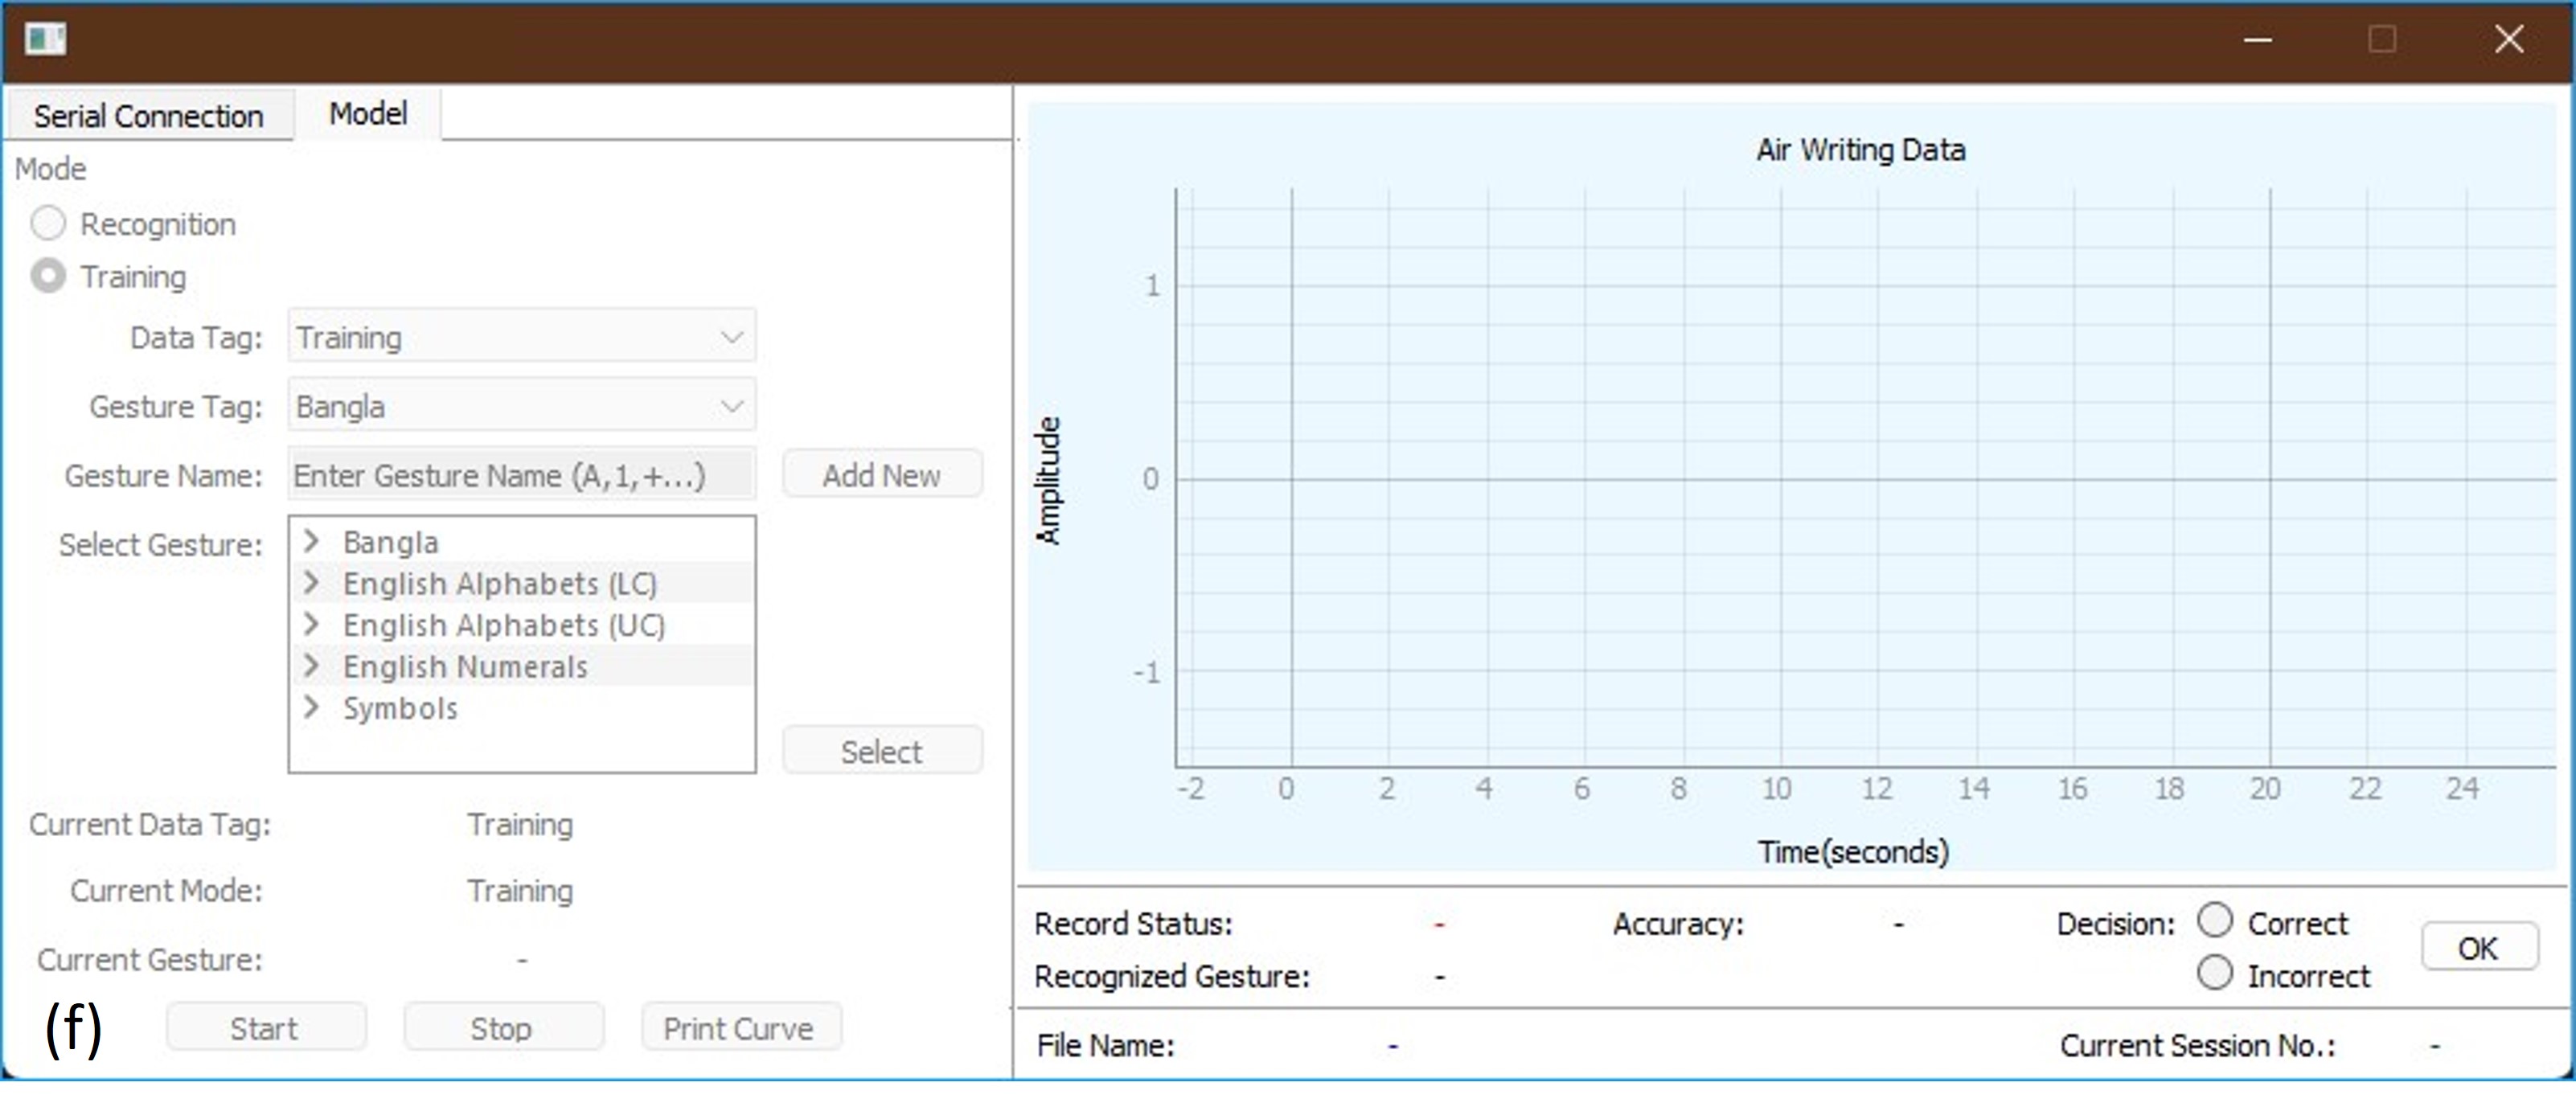
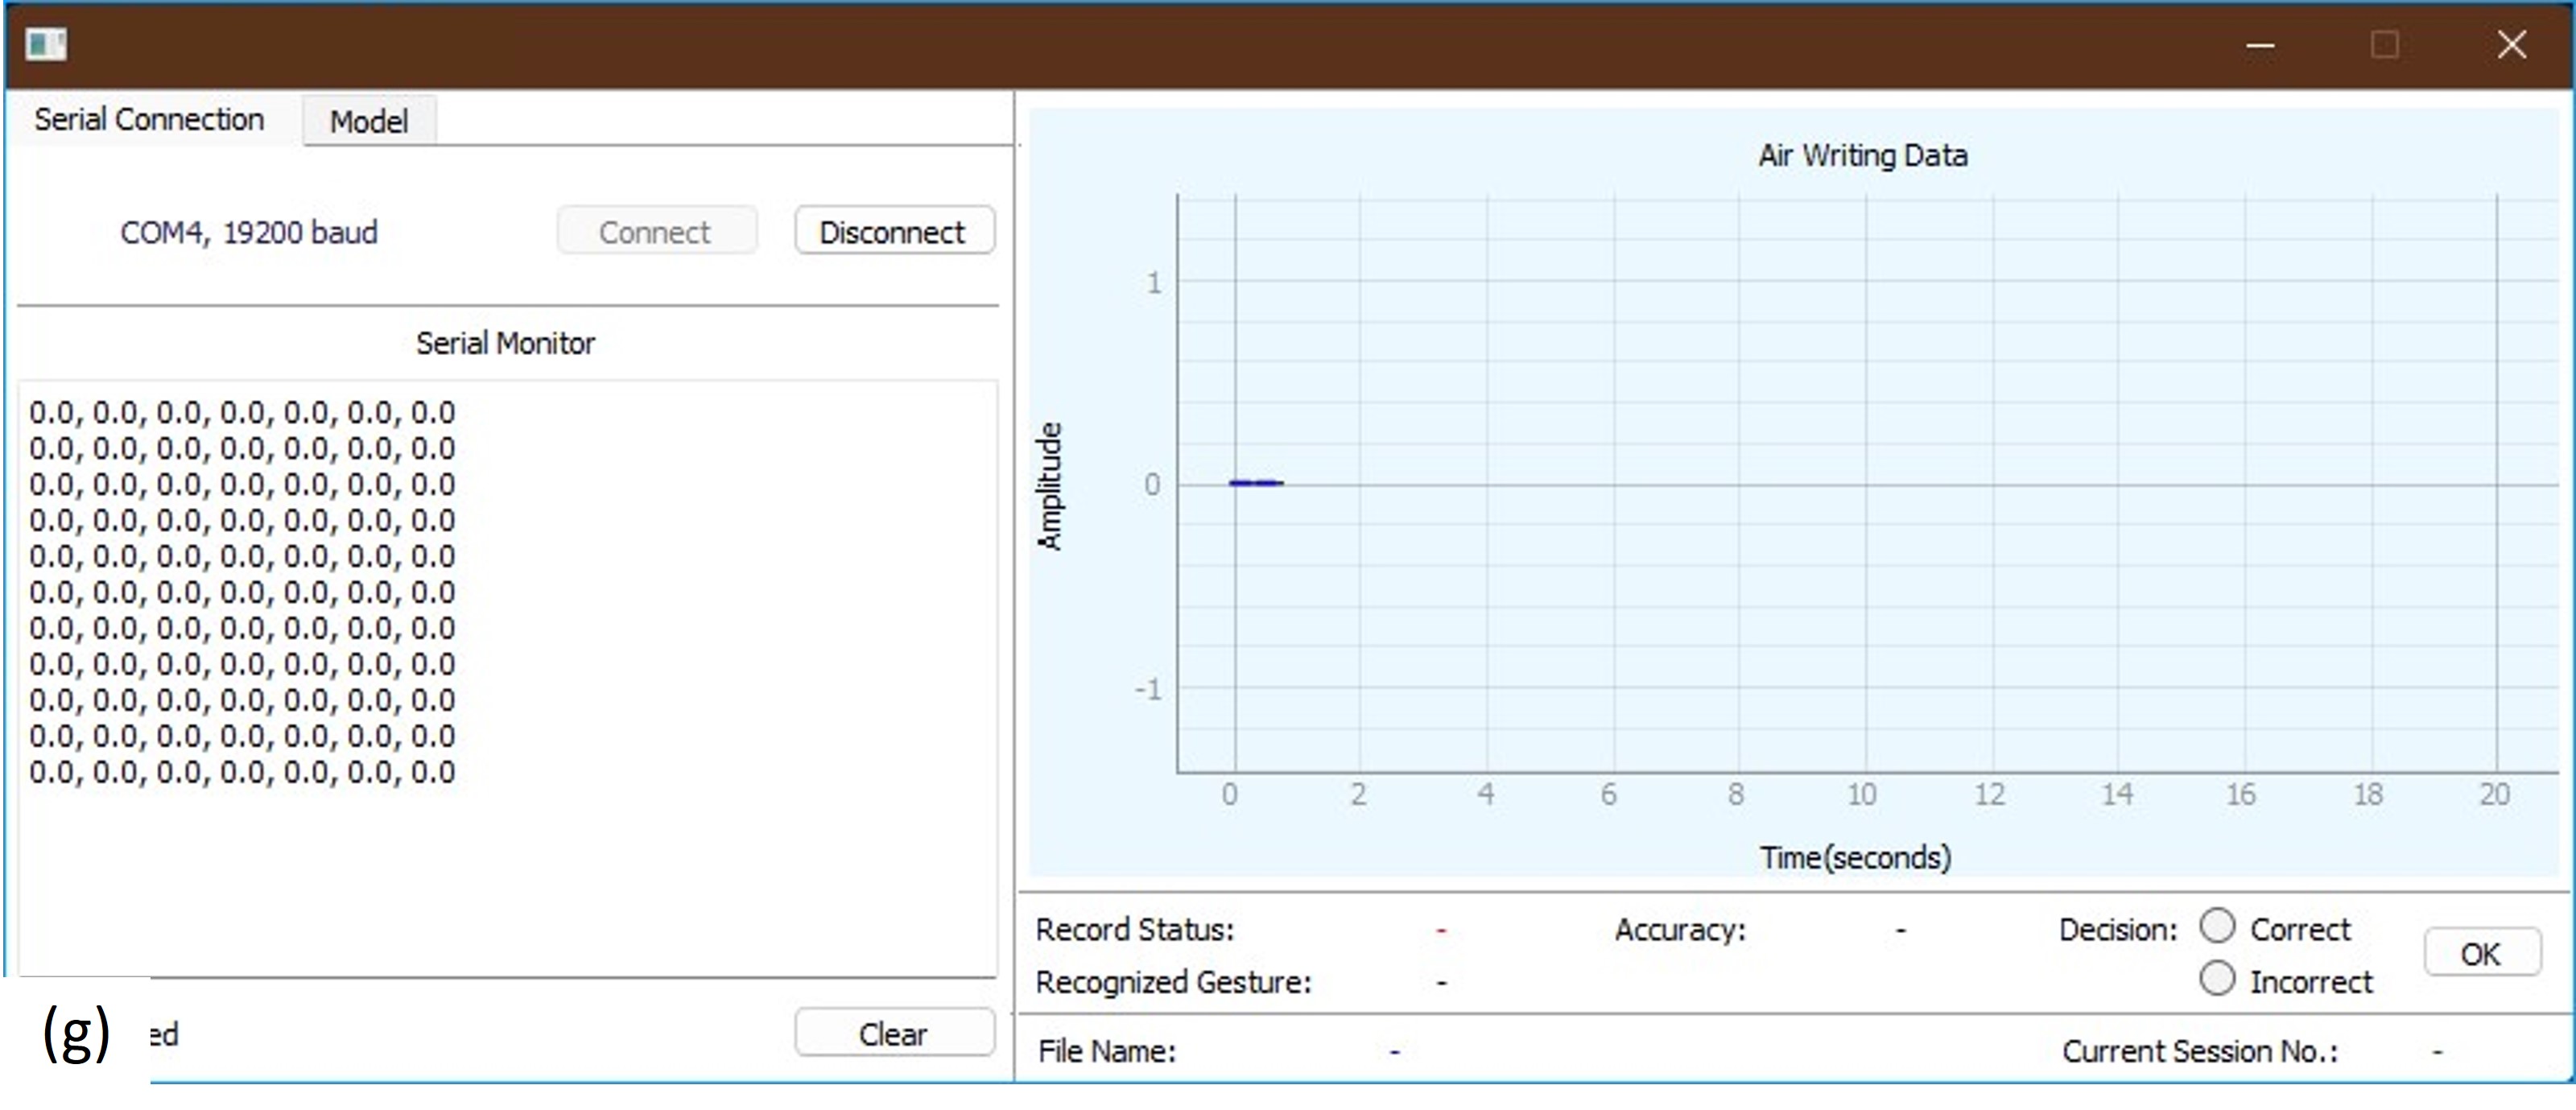
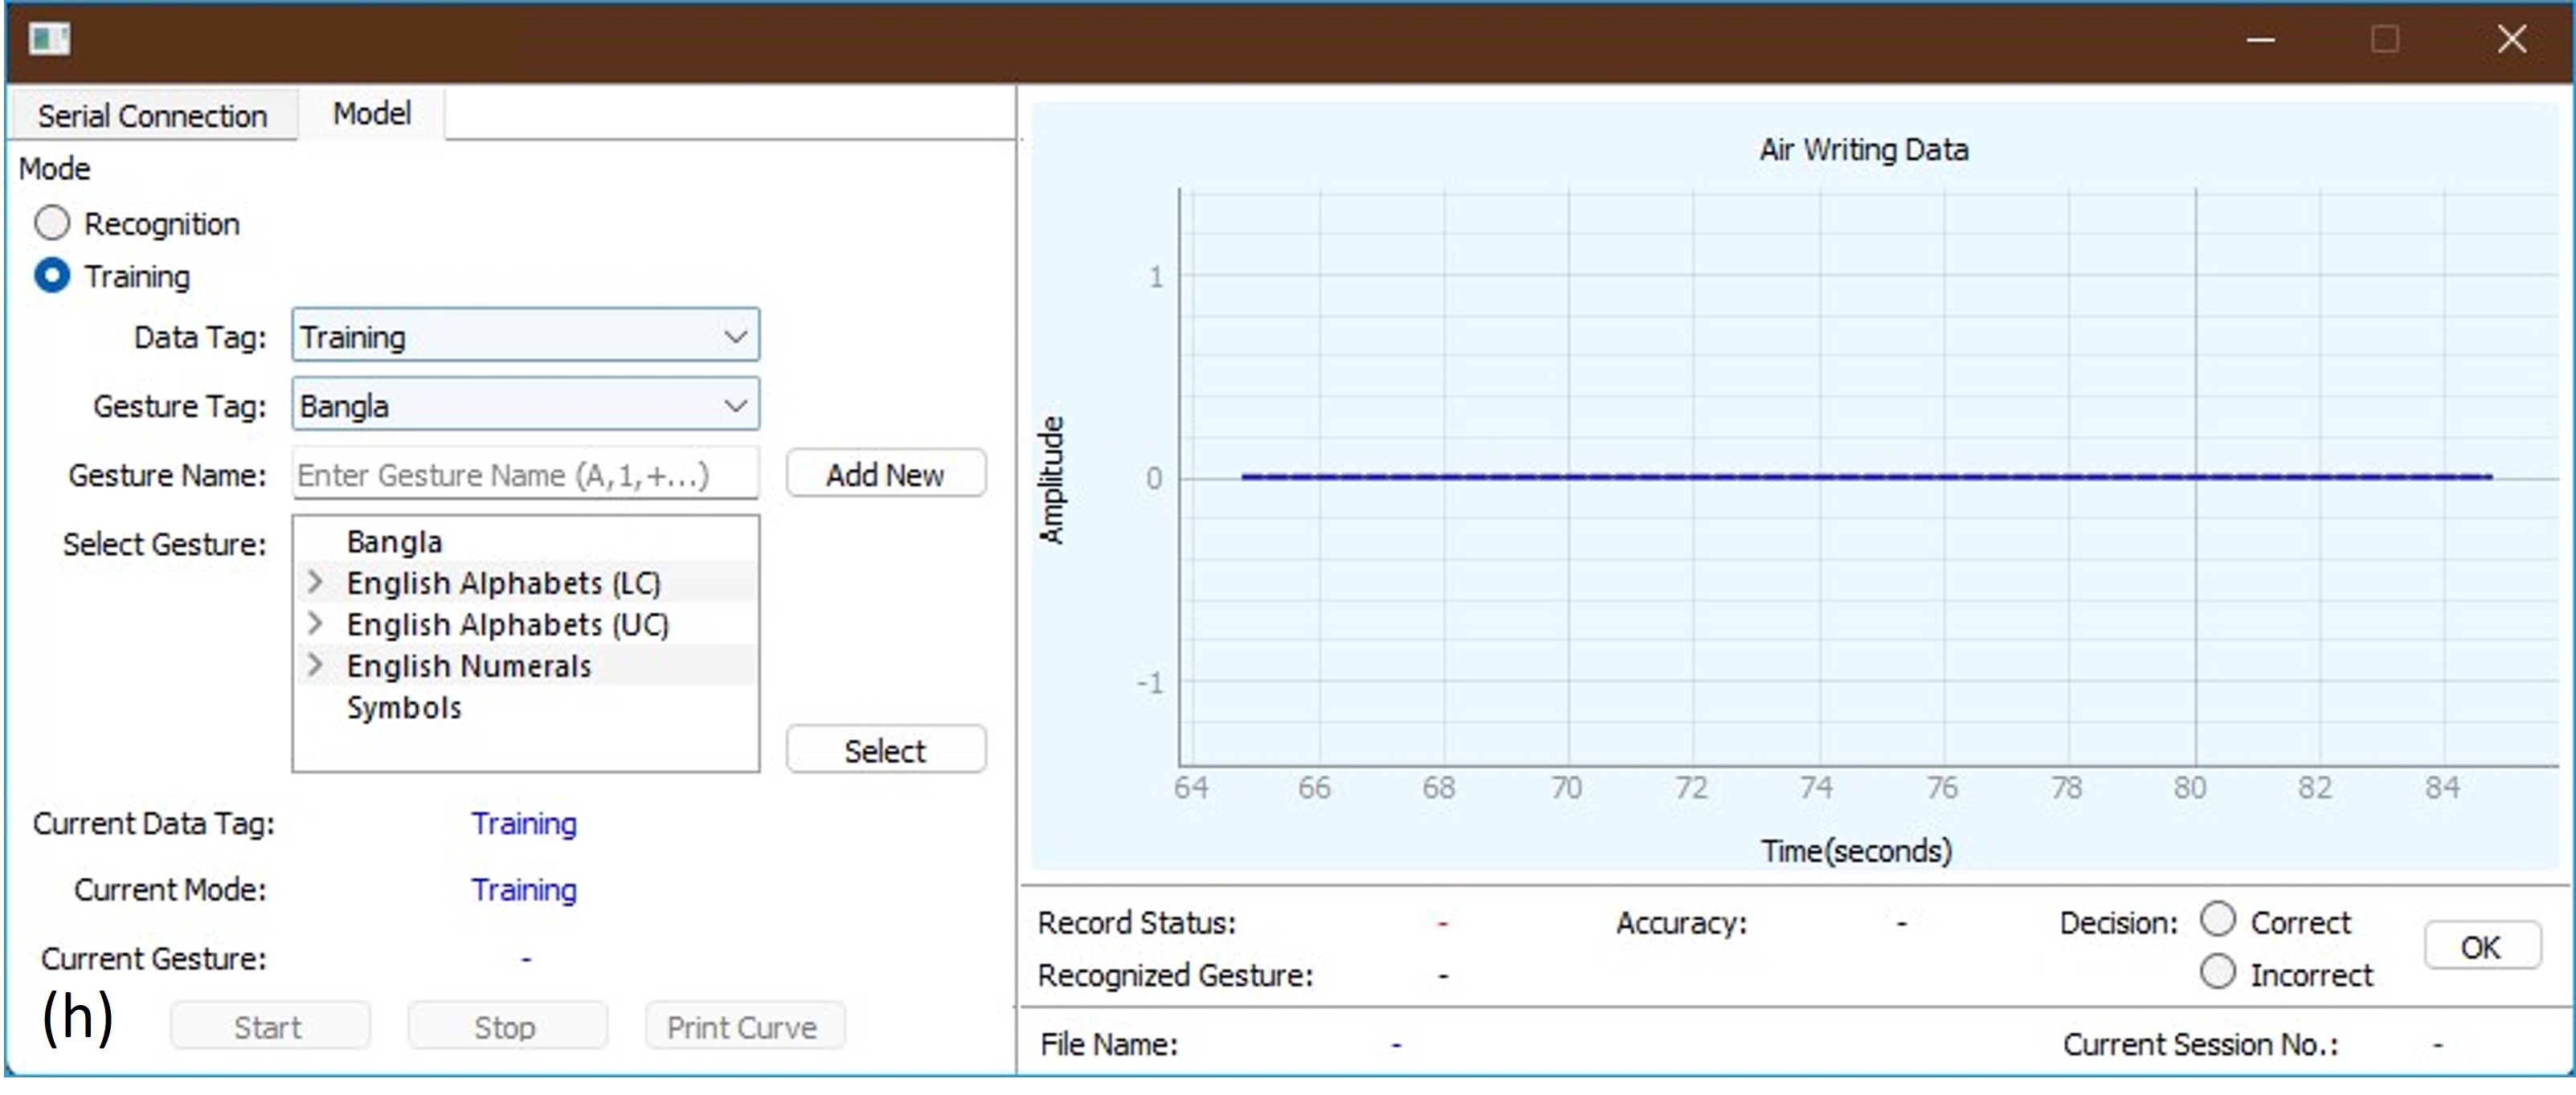
Although the receiver keeps on receiving hand motion data wirelessly from the AirPen, shortly after it is powered up, they will not be communicated to the UI until it establishes a "Serial" connection with it. The reason is that the receiver communicates these data to the system UI via "Serial" communication. Therefore, to establish such a connection, a user needs to press the "Connect" button first [Figure (e)]. Until then, all other functionalities of the UI remains inactive/unavailable [Figures (e) and (f)] in order to maintain system integrity. Upon connection, the system UI facilitates real-time visualization of these data both graphically and textually in the "Air Writing Data"-plot and the "Serial Monitor", respectively [Figure (g)]. Additionally, a user can interact with the UI elements of the "Model" tab for setting up meta-information related to a gesture [Figure (h)], which will be explained in the next section.
Gesture Setup
In the "Model" tab of the UI, a user can set various meta-information of the data to be
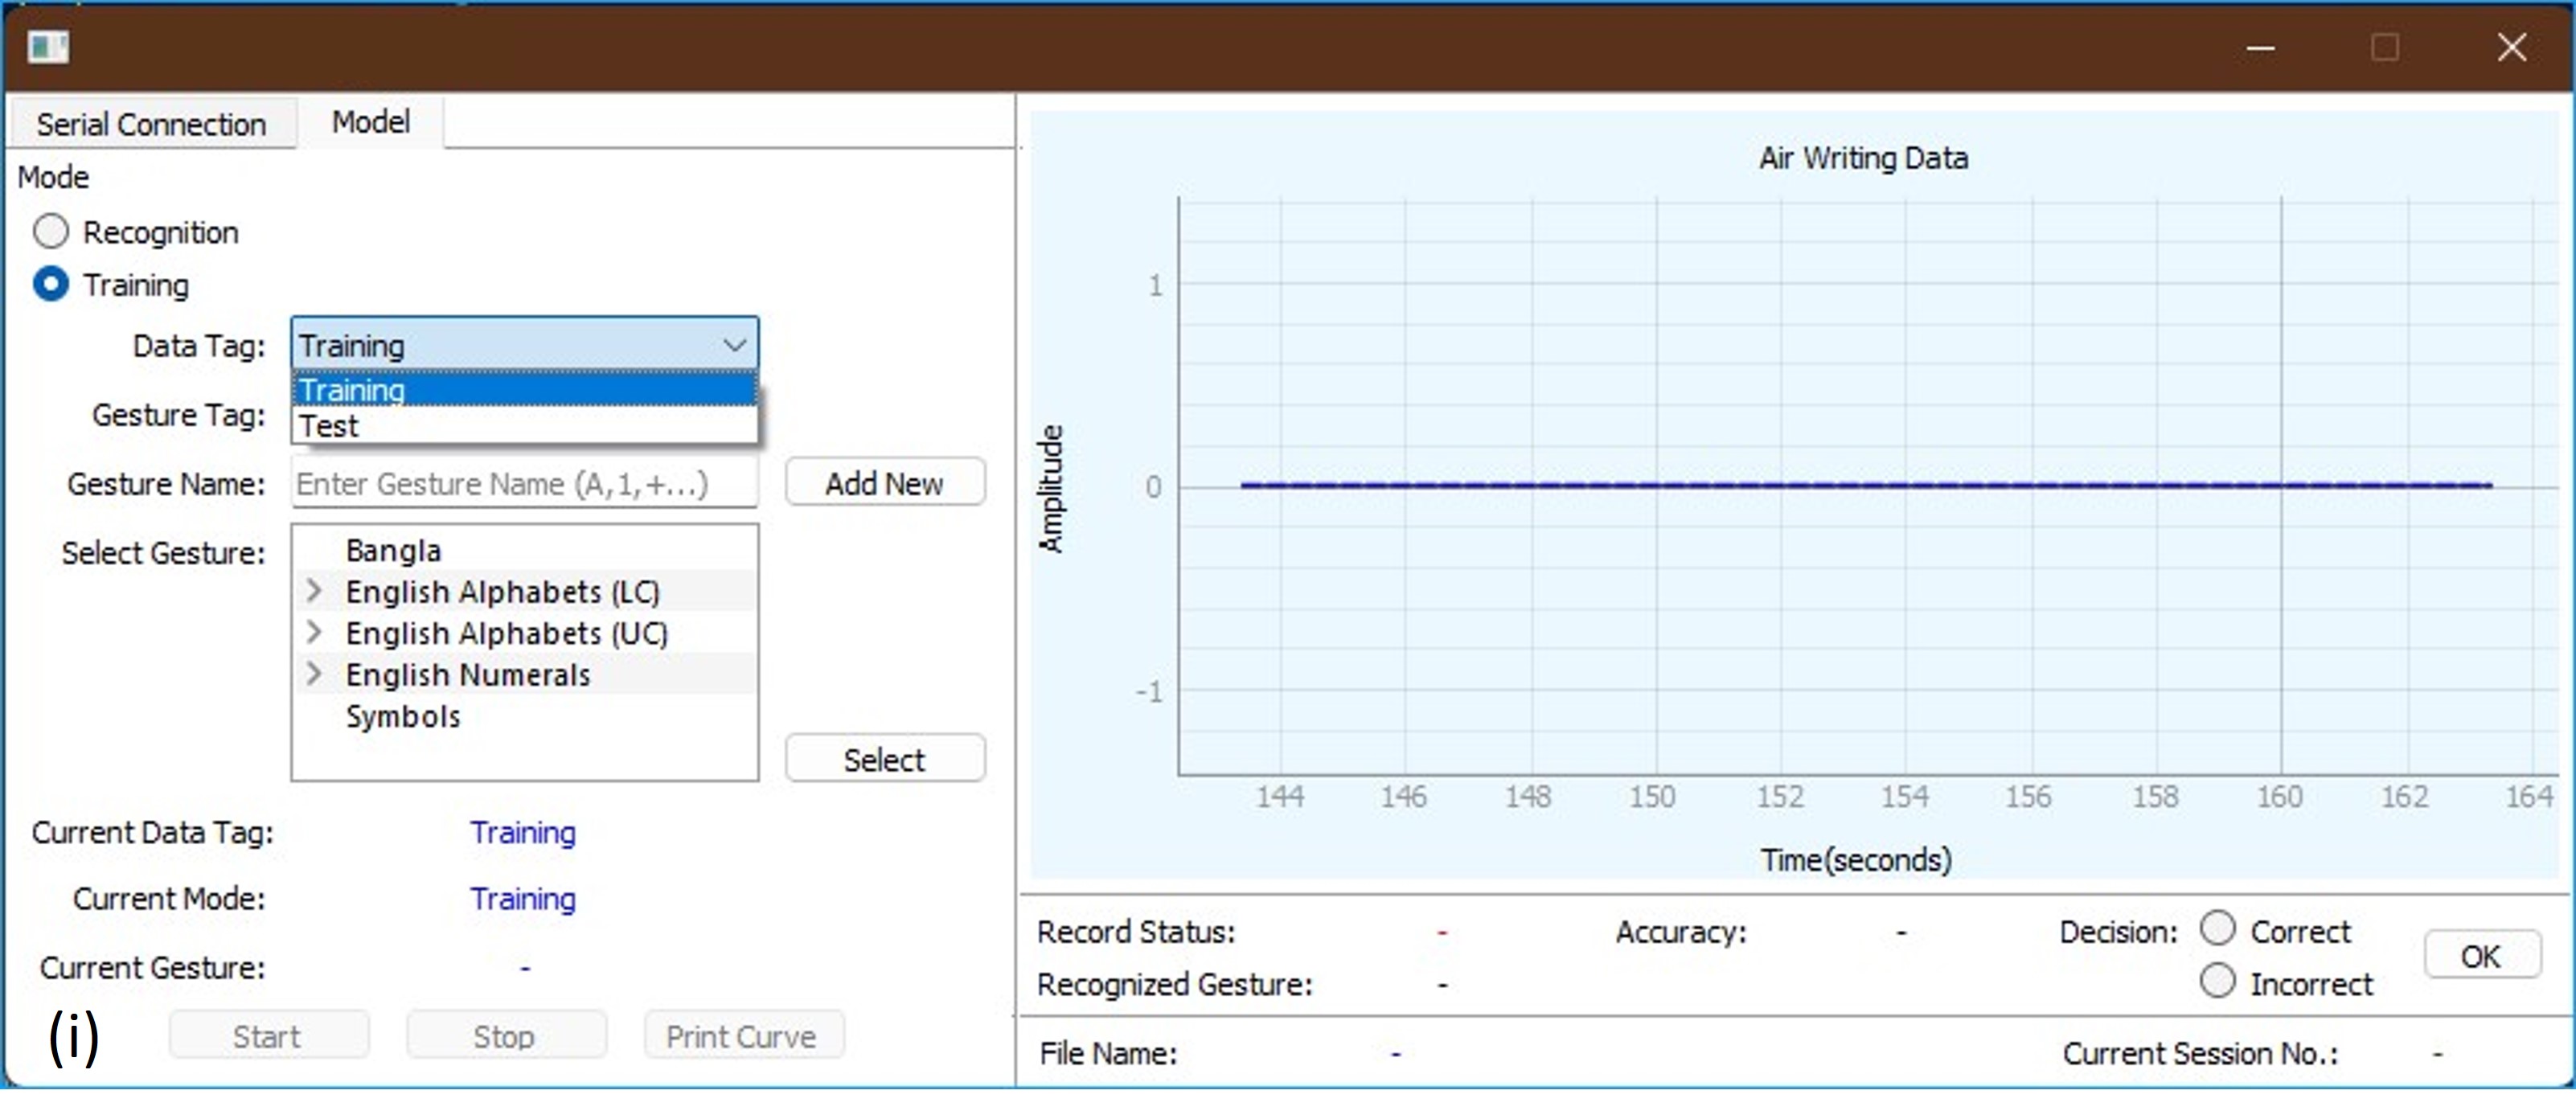
recorded for a particular gesture. There are two modes in the UI, "Recognition" and
"Training" [Figure (i)].
The "Training" mode facilitates data collection required for training ML/DL models
designed for Air-written Character Recognition (ACR), with automated organization of data
(corresponding to a gesture for a particular character) in designated folders [Figure (m)] (More on this later!). The
functionalities relevant to this mode have all been implemented. The "Data Tag" field
[Figure (i)] allows users to decide on the type of
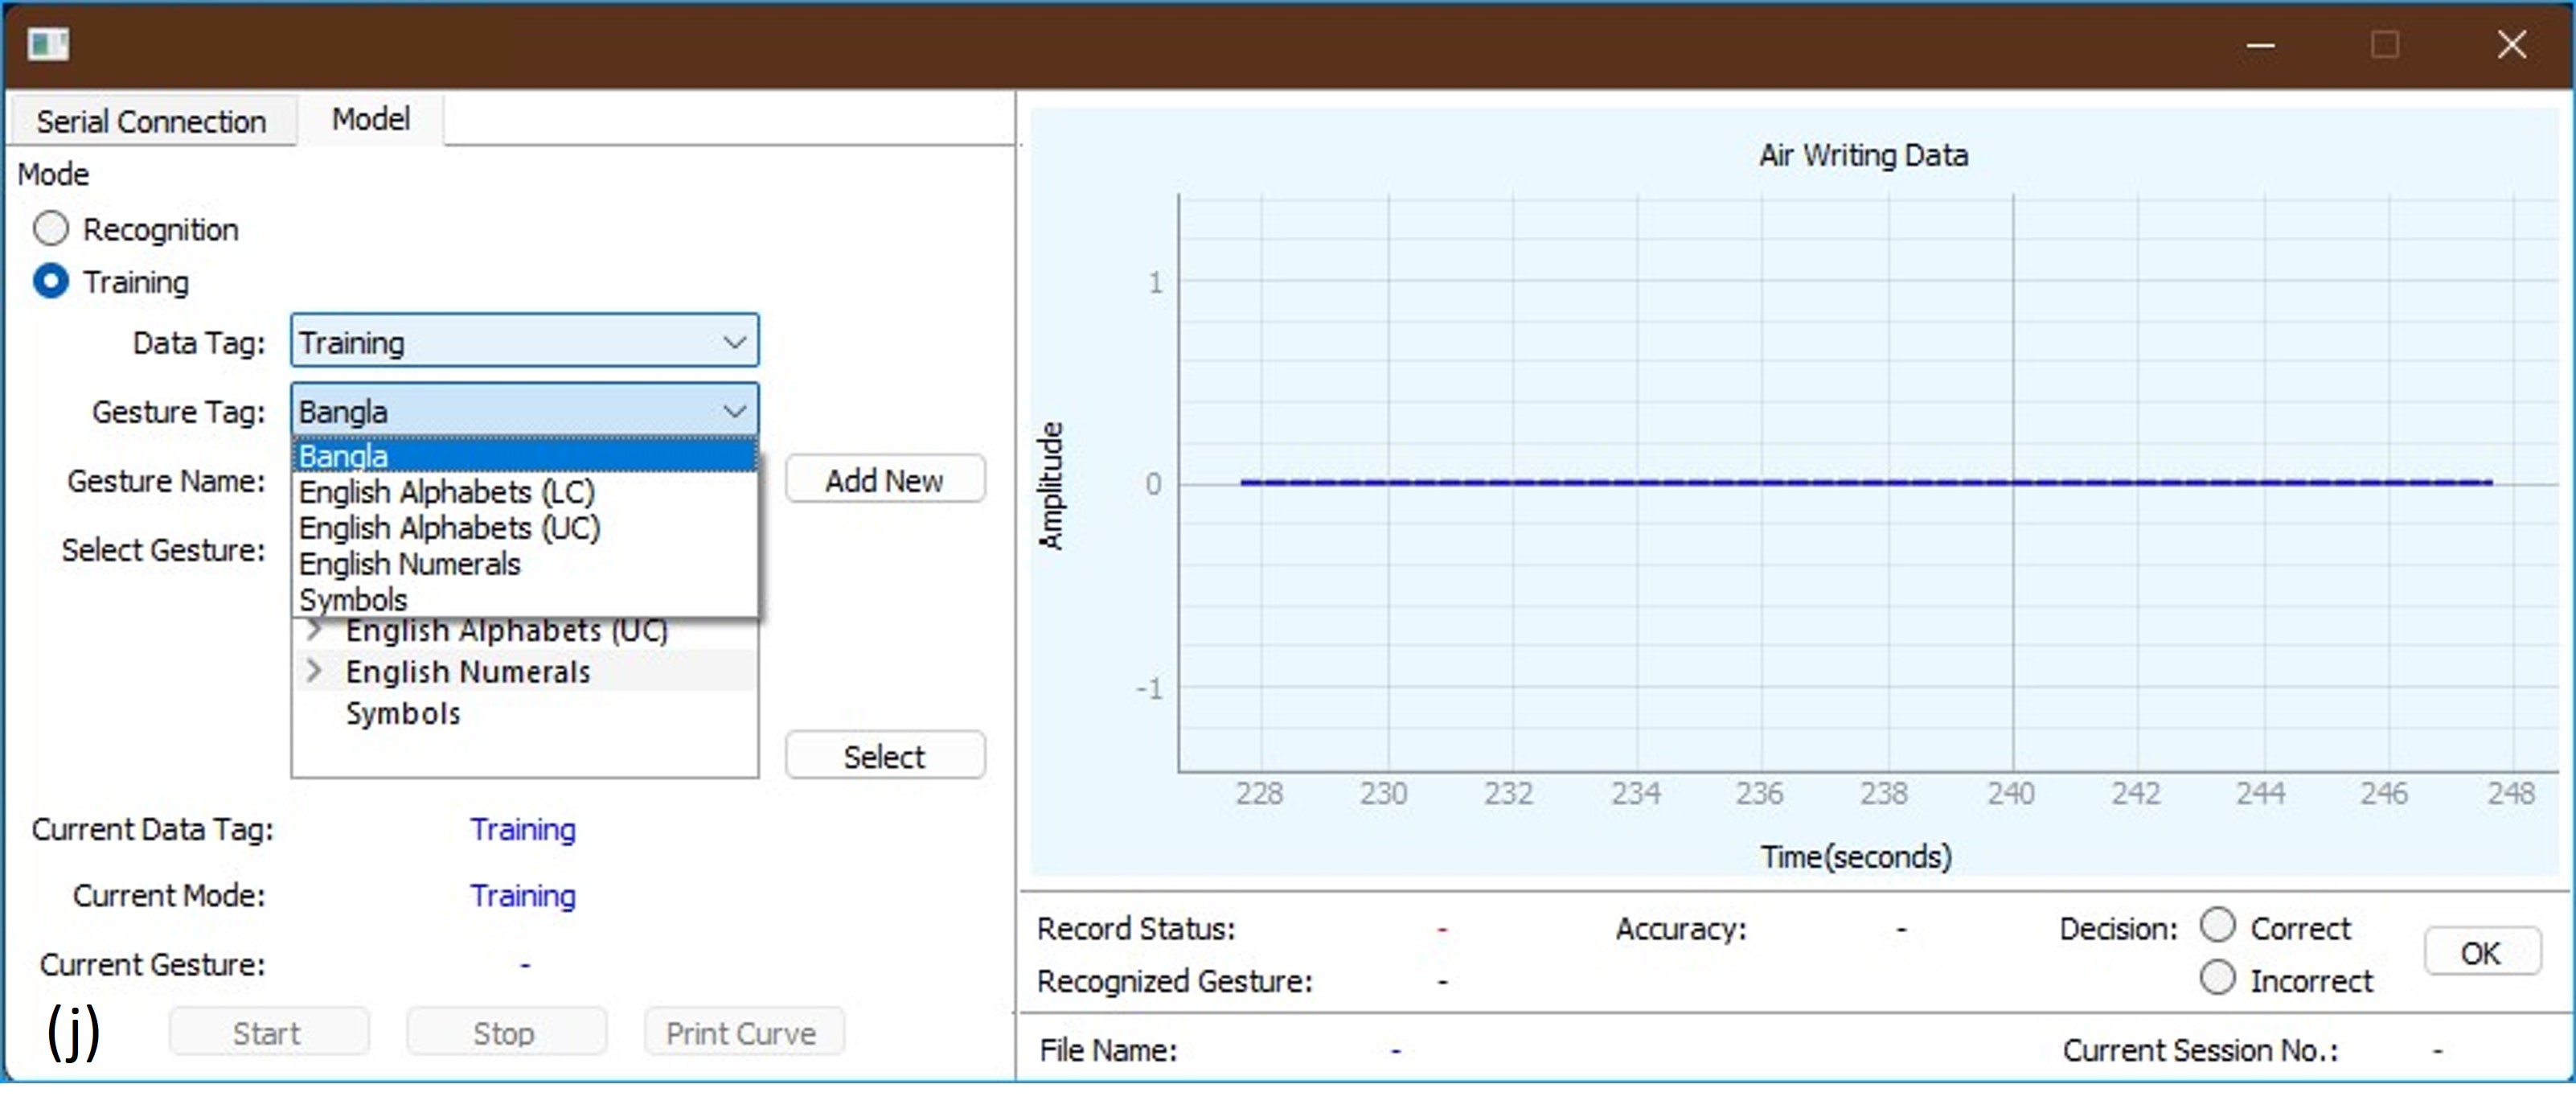
data they want to record - "Training" or "Test". The "Gesture Tag" field
[Figure (j)] on the other hand, allows them to select
the language to which a particular character belongs. Although it currently it has hard-coded
support for "Bangla" and "English" languages only, the UI may be modified to
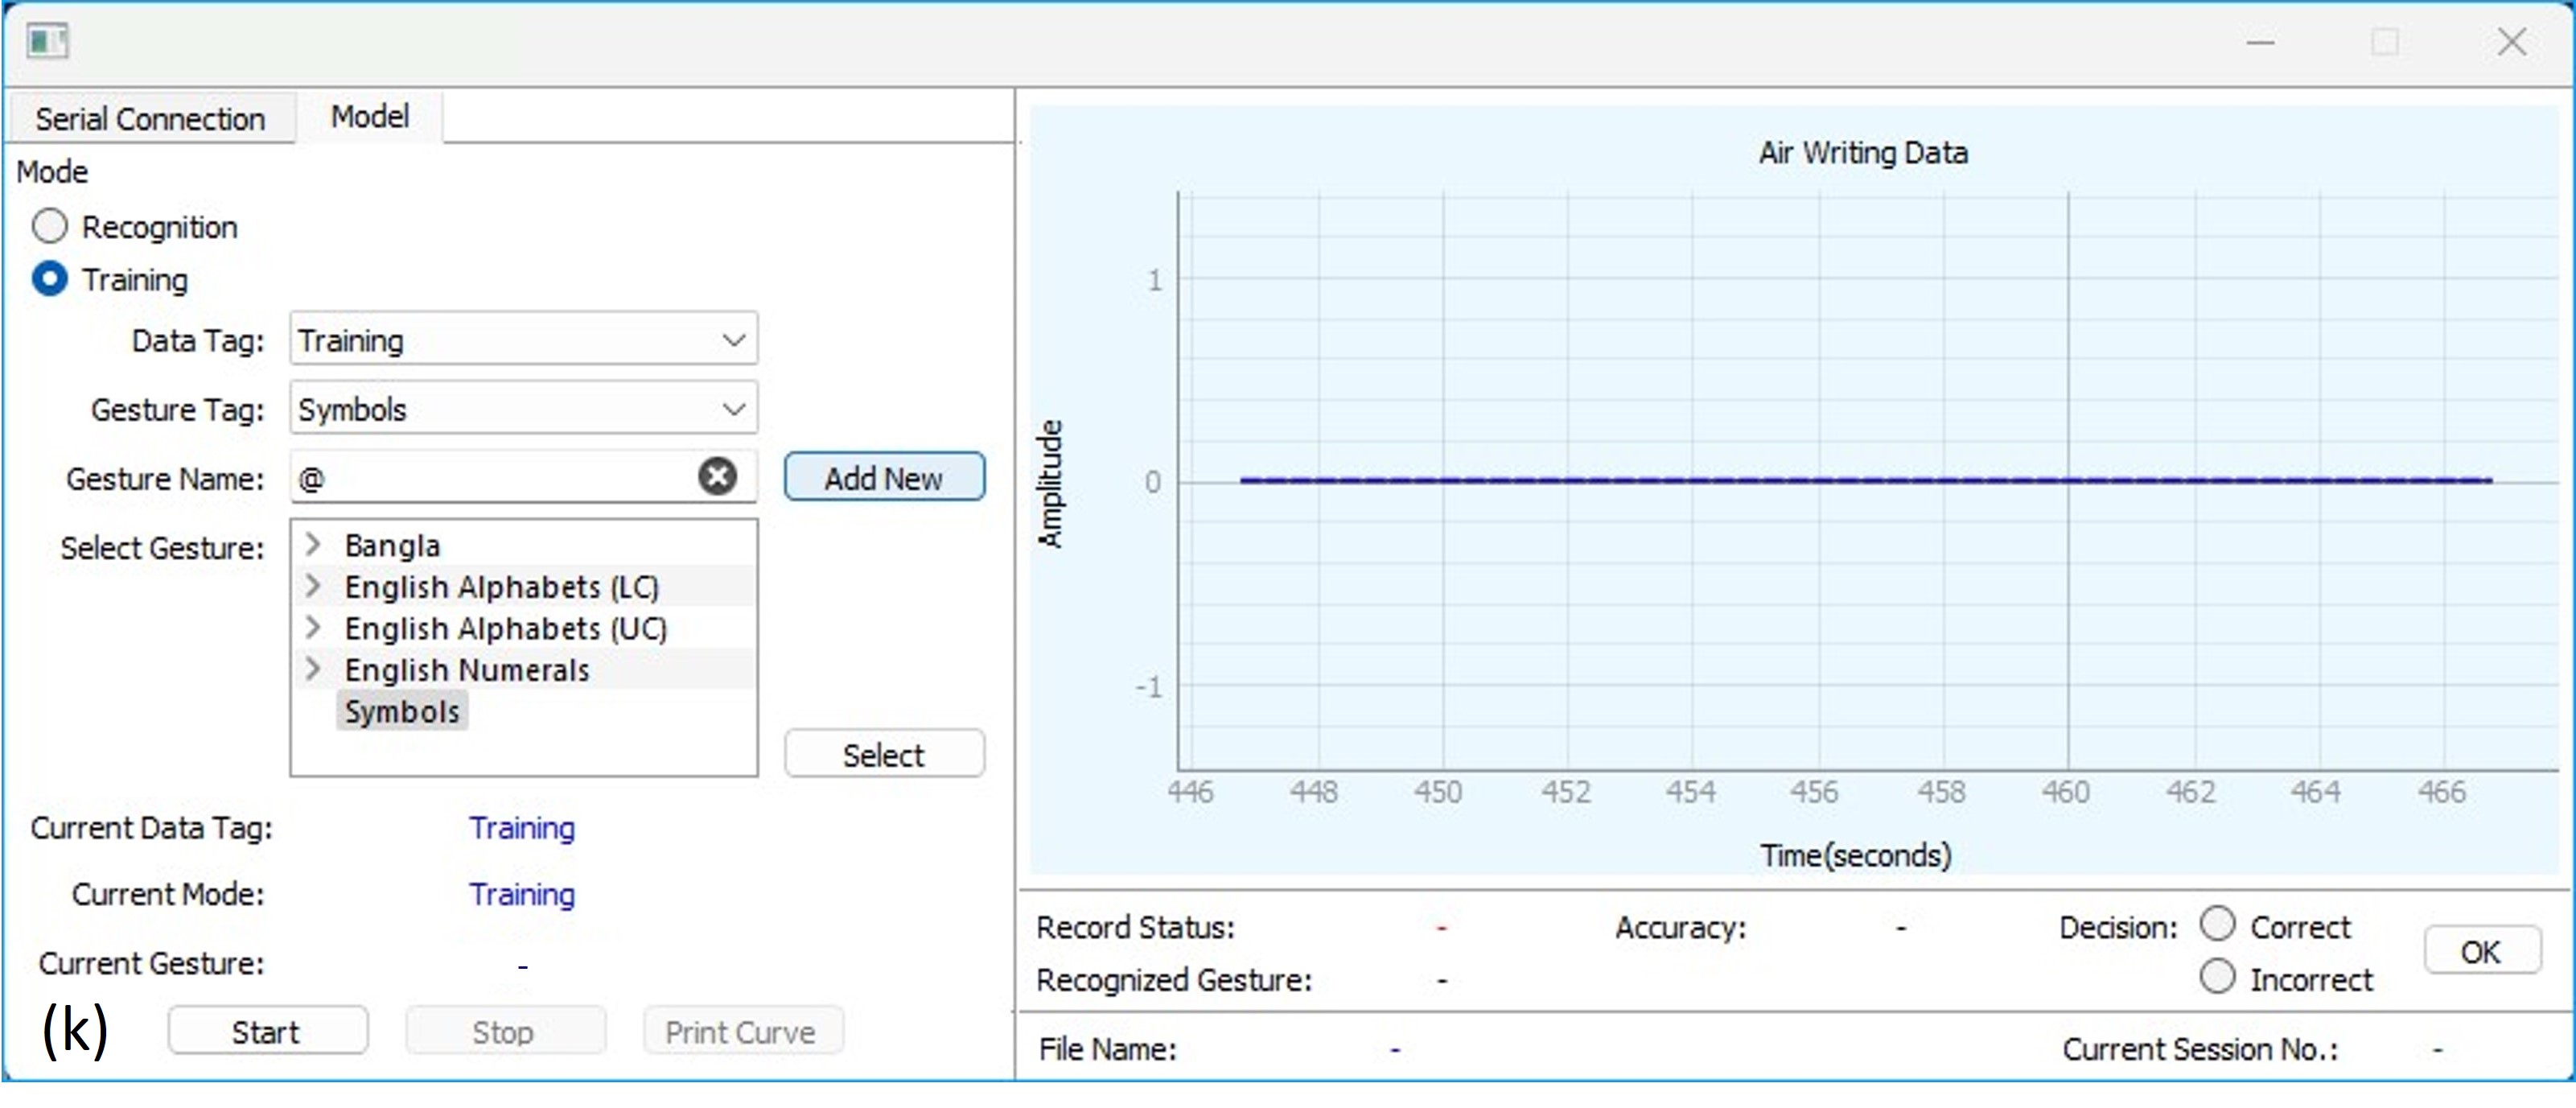
allow users to add new languages, similar to the "Gesture Name" field. This field allows
users to add any character to a particular "Gesture Tag" with the "Add New"
button [Figure (k)]. If the gesture already exists in
the record, a warning (image not shown), "Gesture already exists!", will be given to the
user. As an example, suppose a user wants to add motion data corresponding to the symbol
"@" under the data tag, "Training", and the gesture tag, "Symbols" [Figure (k)], they will simply type the character
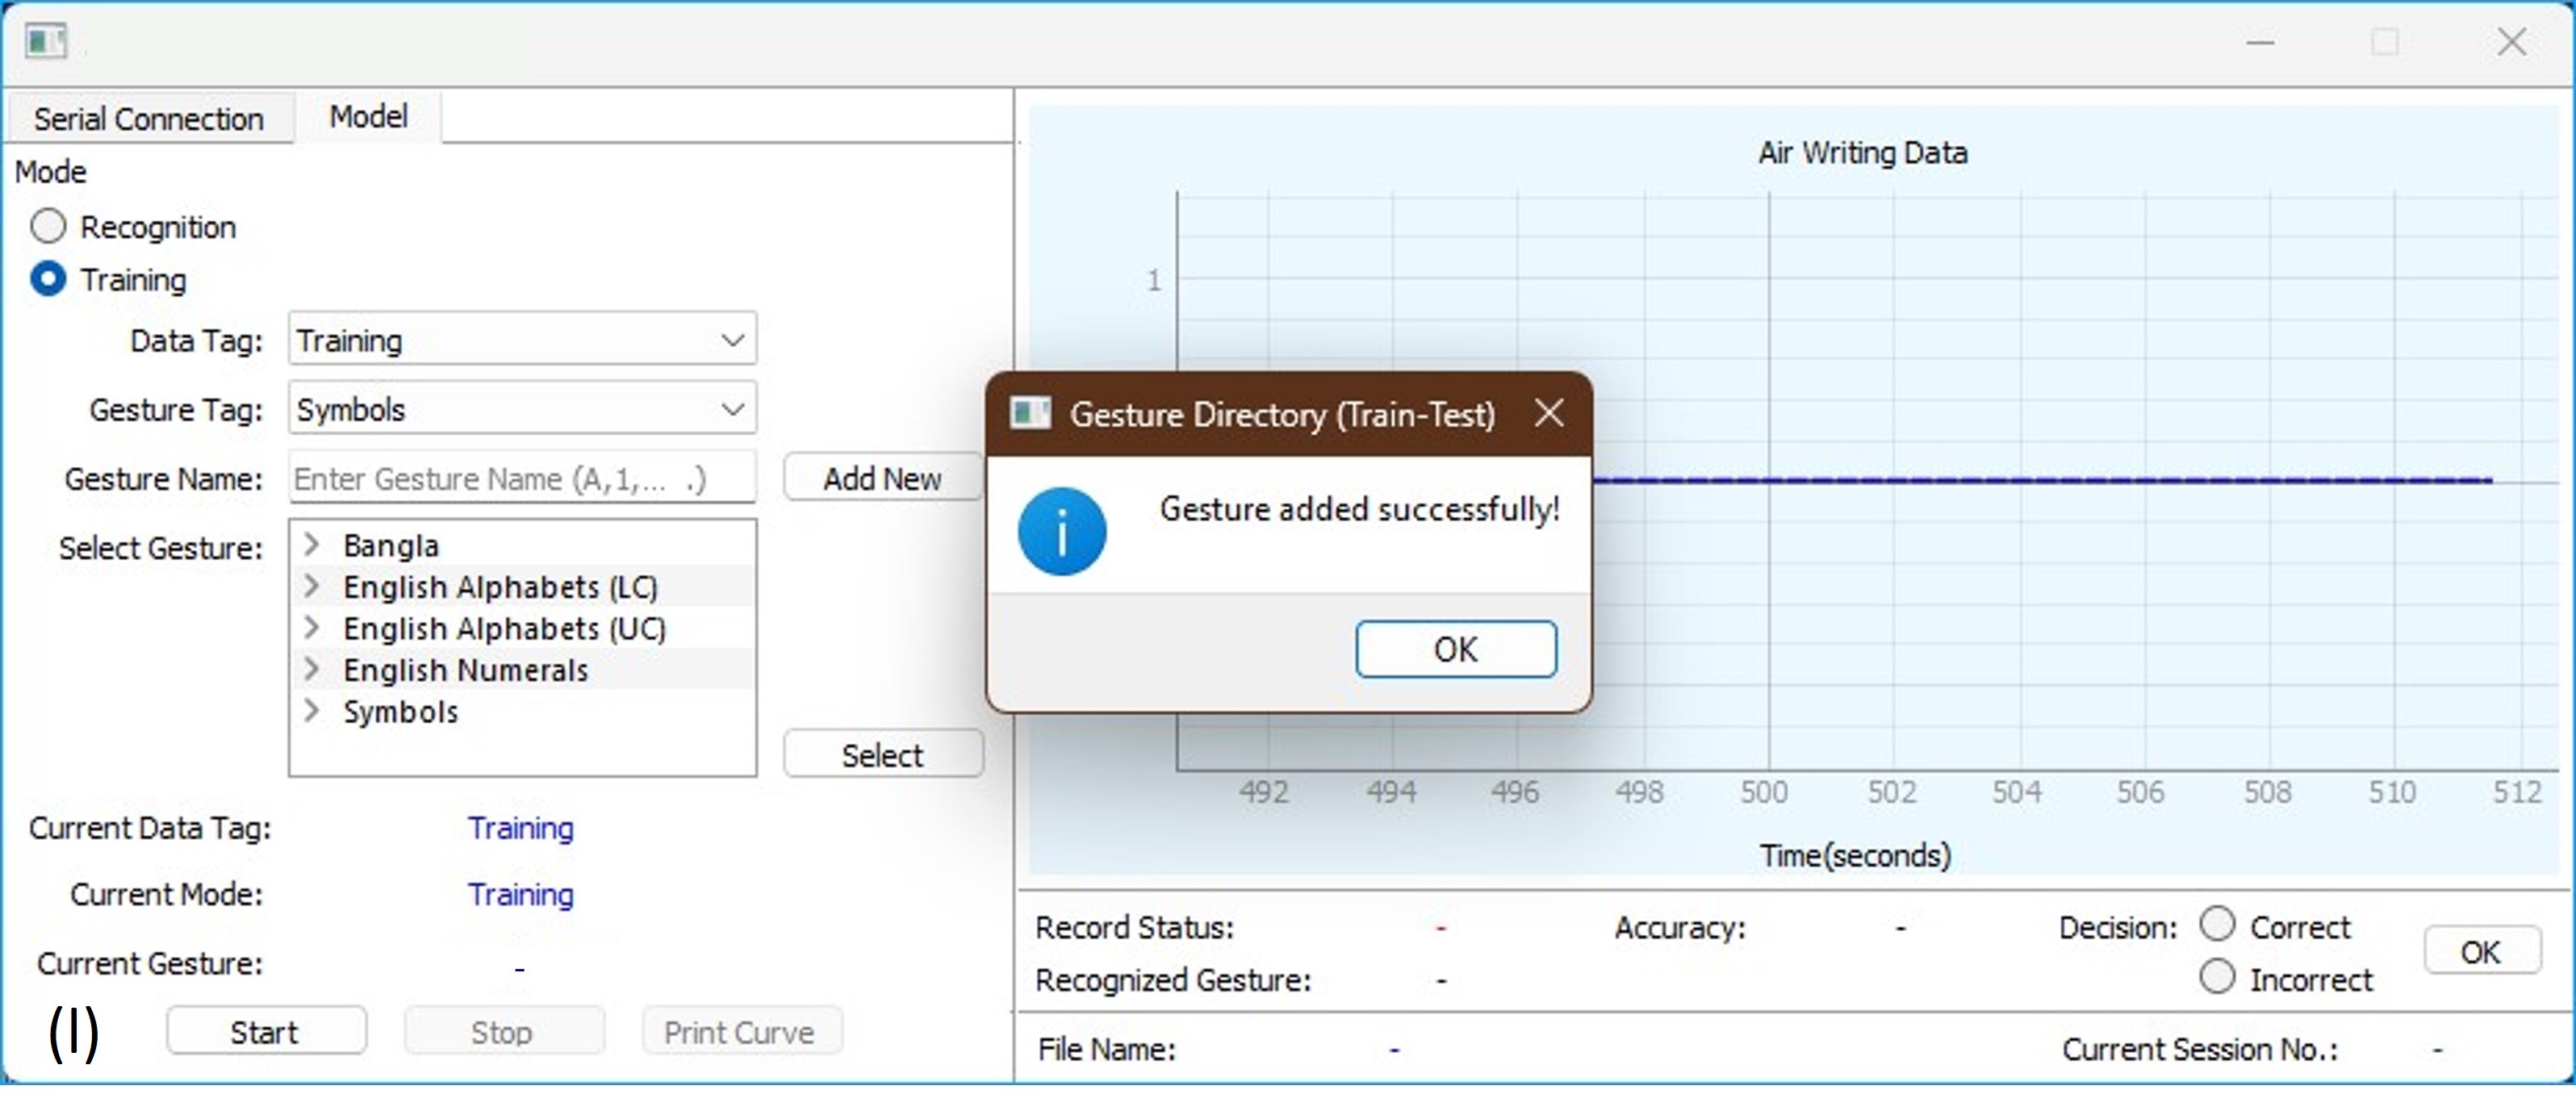
"@" in the "Gesture Name" field and then click on the "Add New" button. A
successful addition will prompt the user with a, "Gesture added successfully!", message
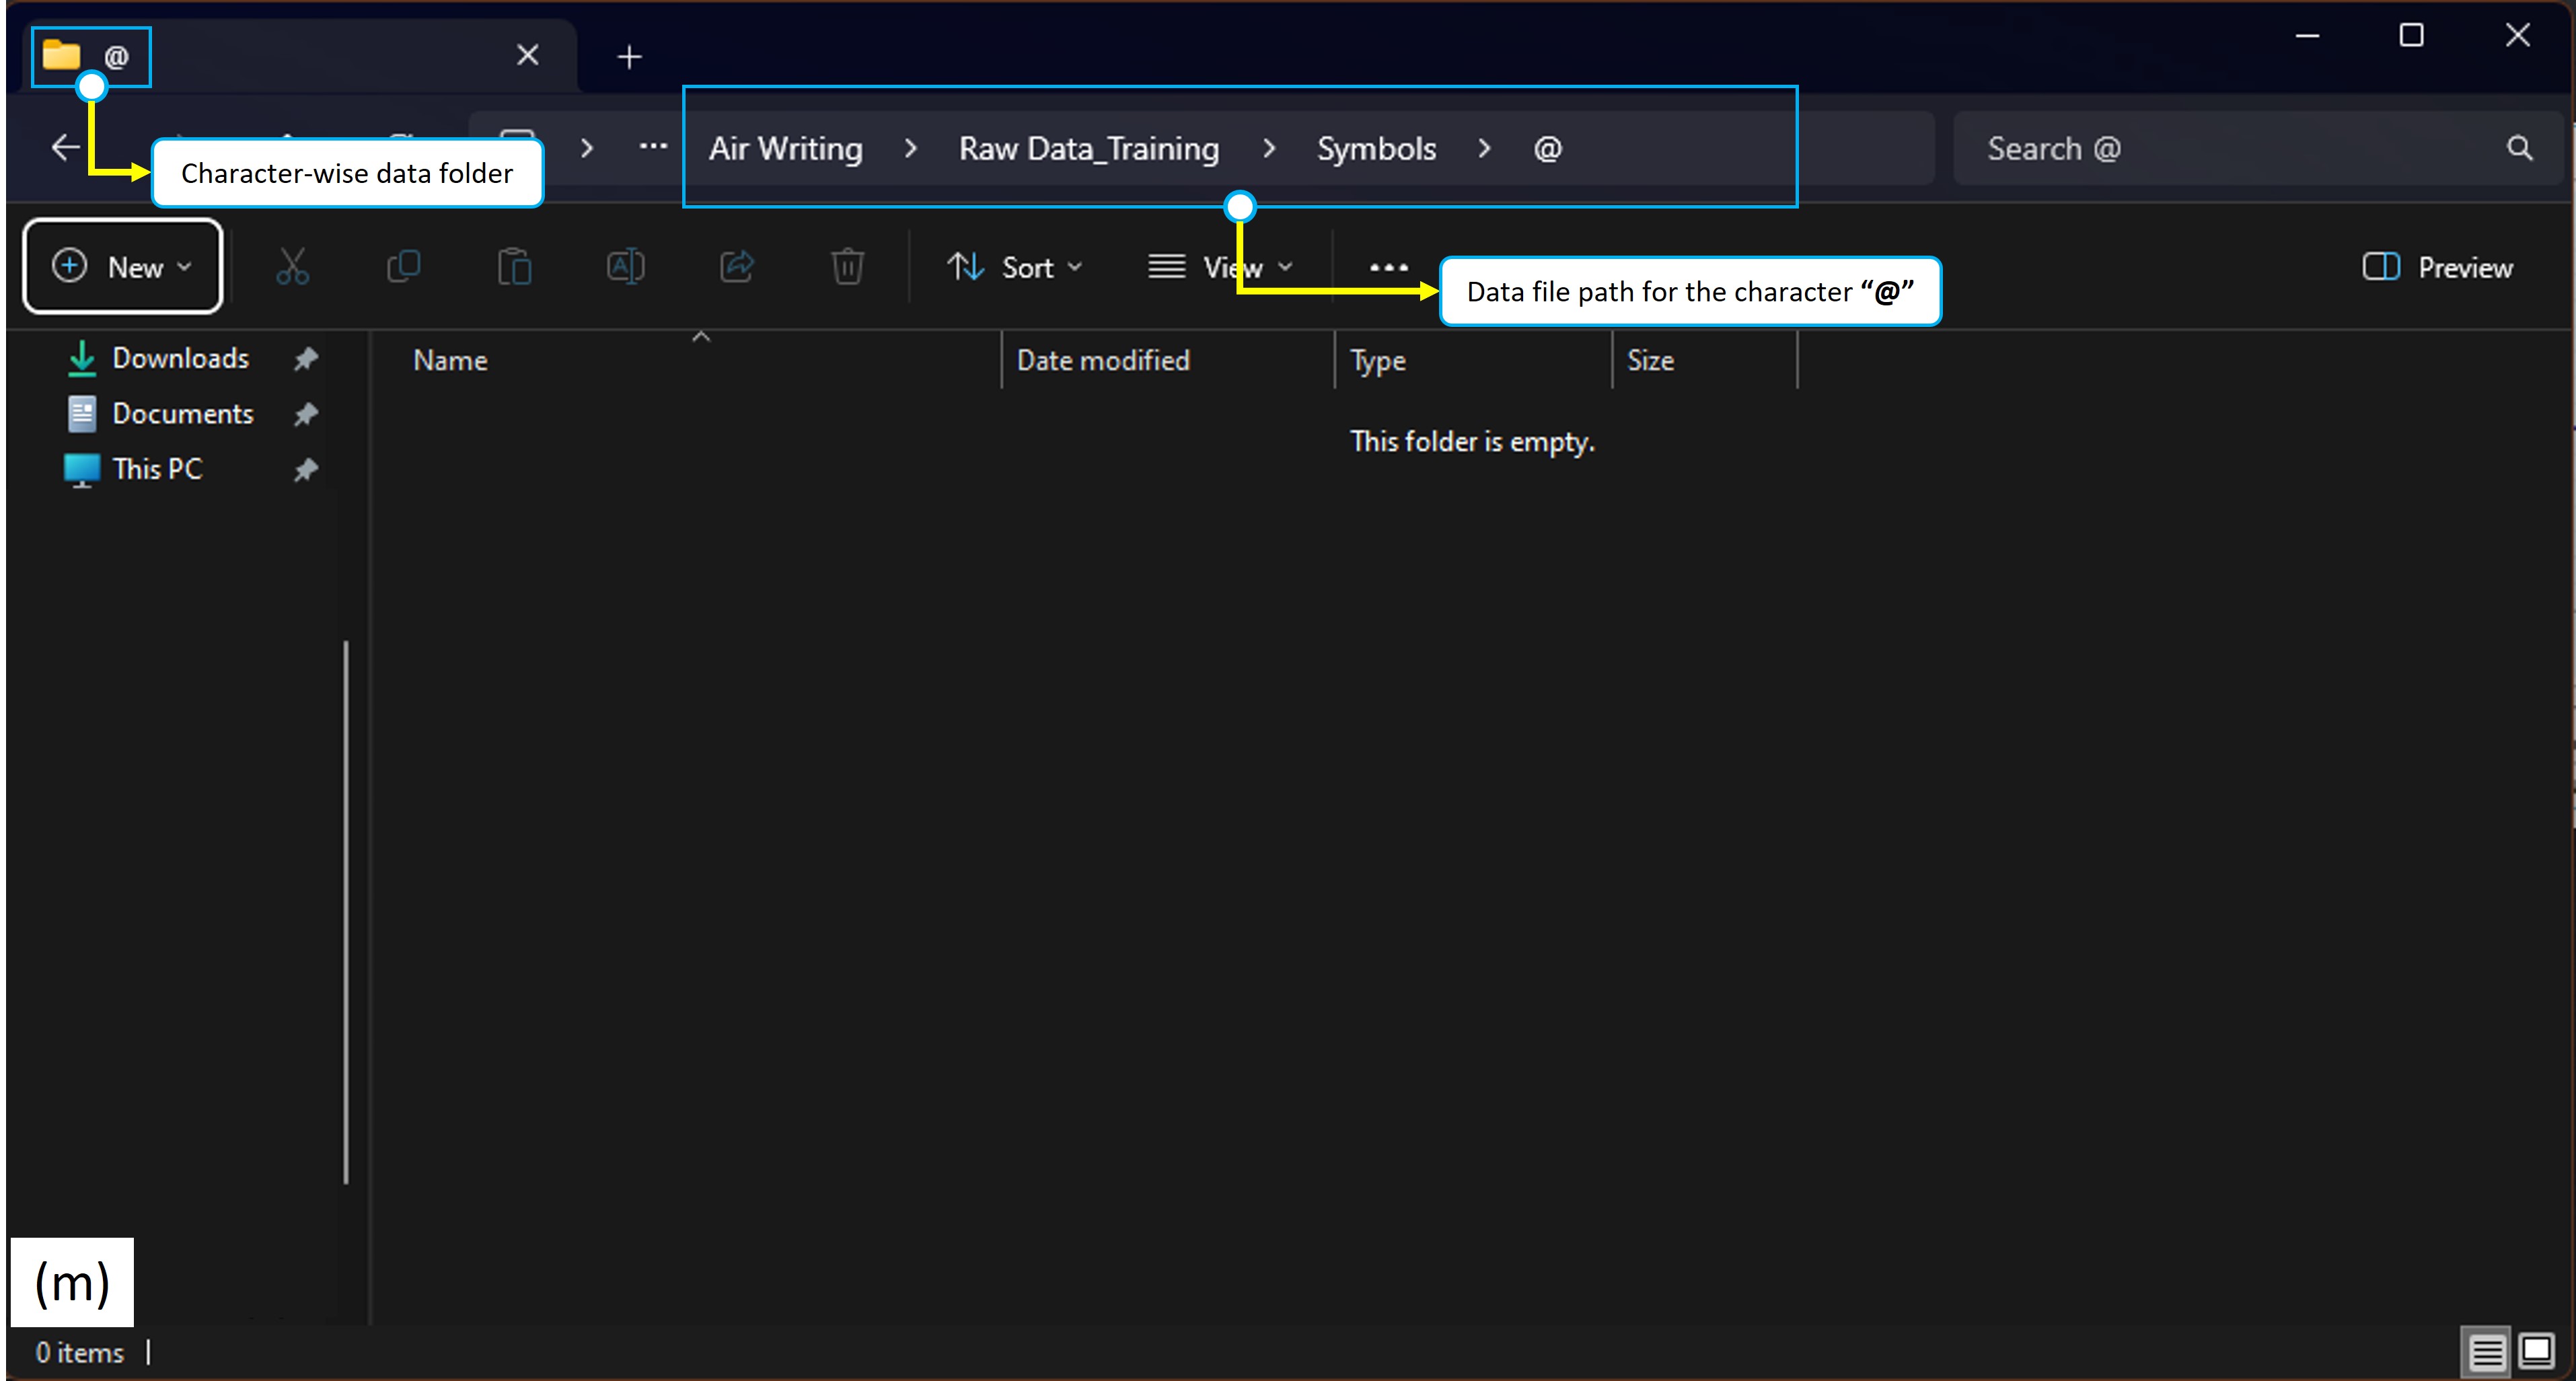
[Figure (l)]. This operation basically creates a
directory "@" according to the hierarchy, "Air Writing > Raw Data_Training > Symbols
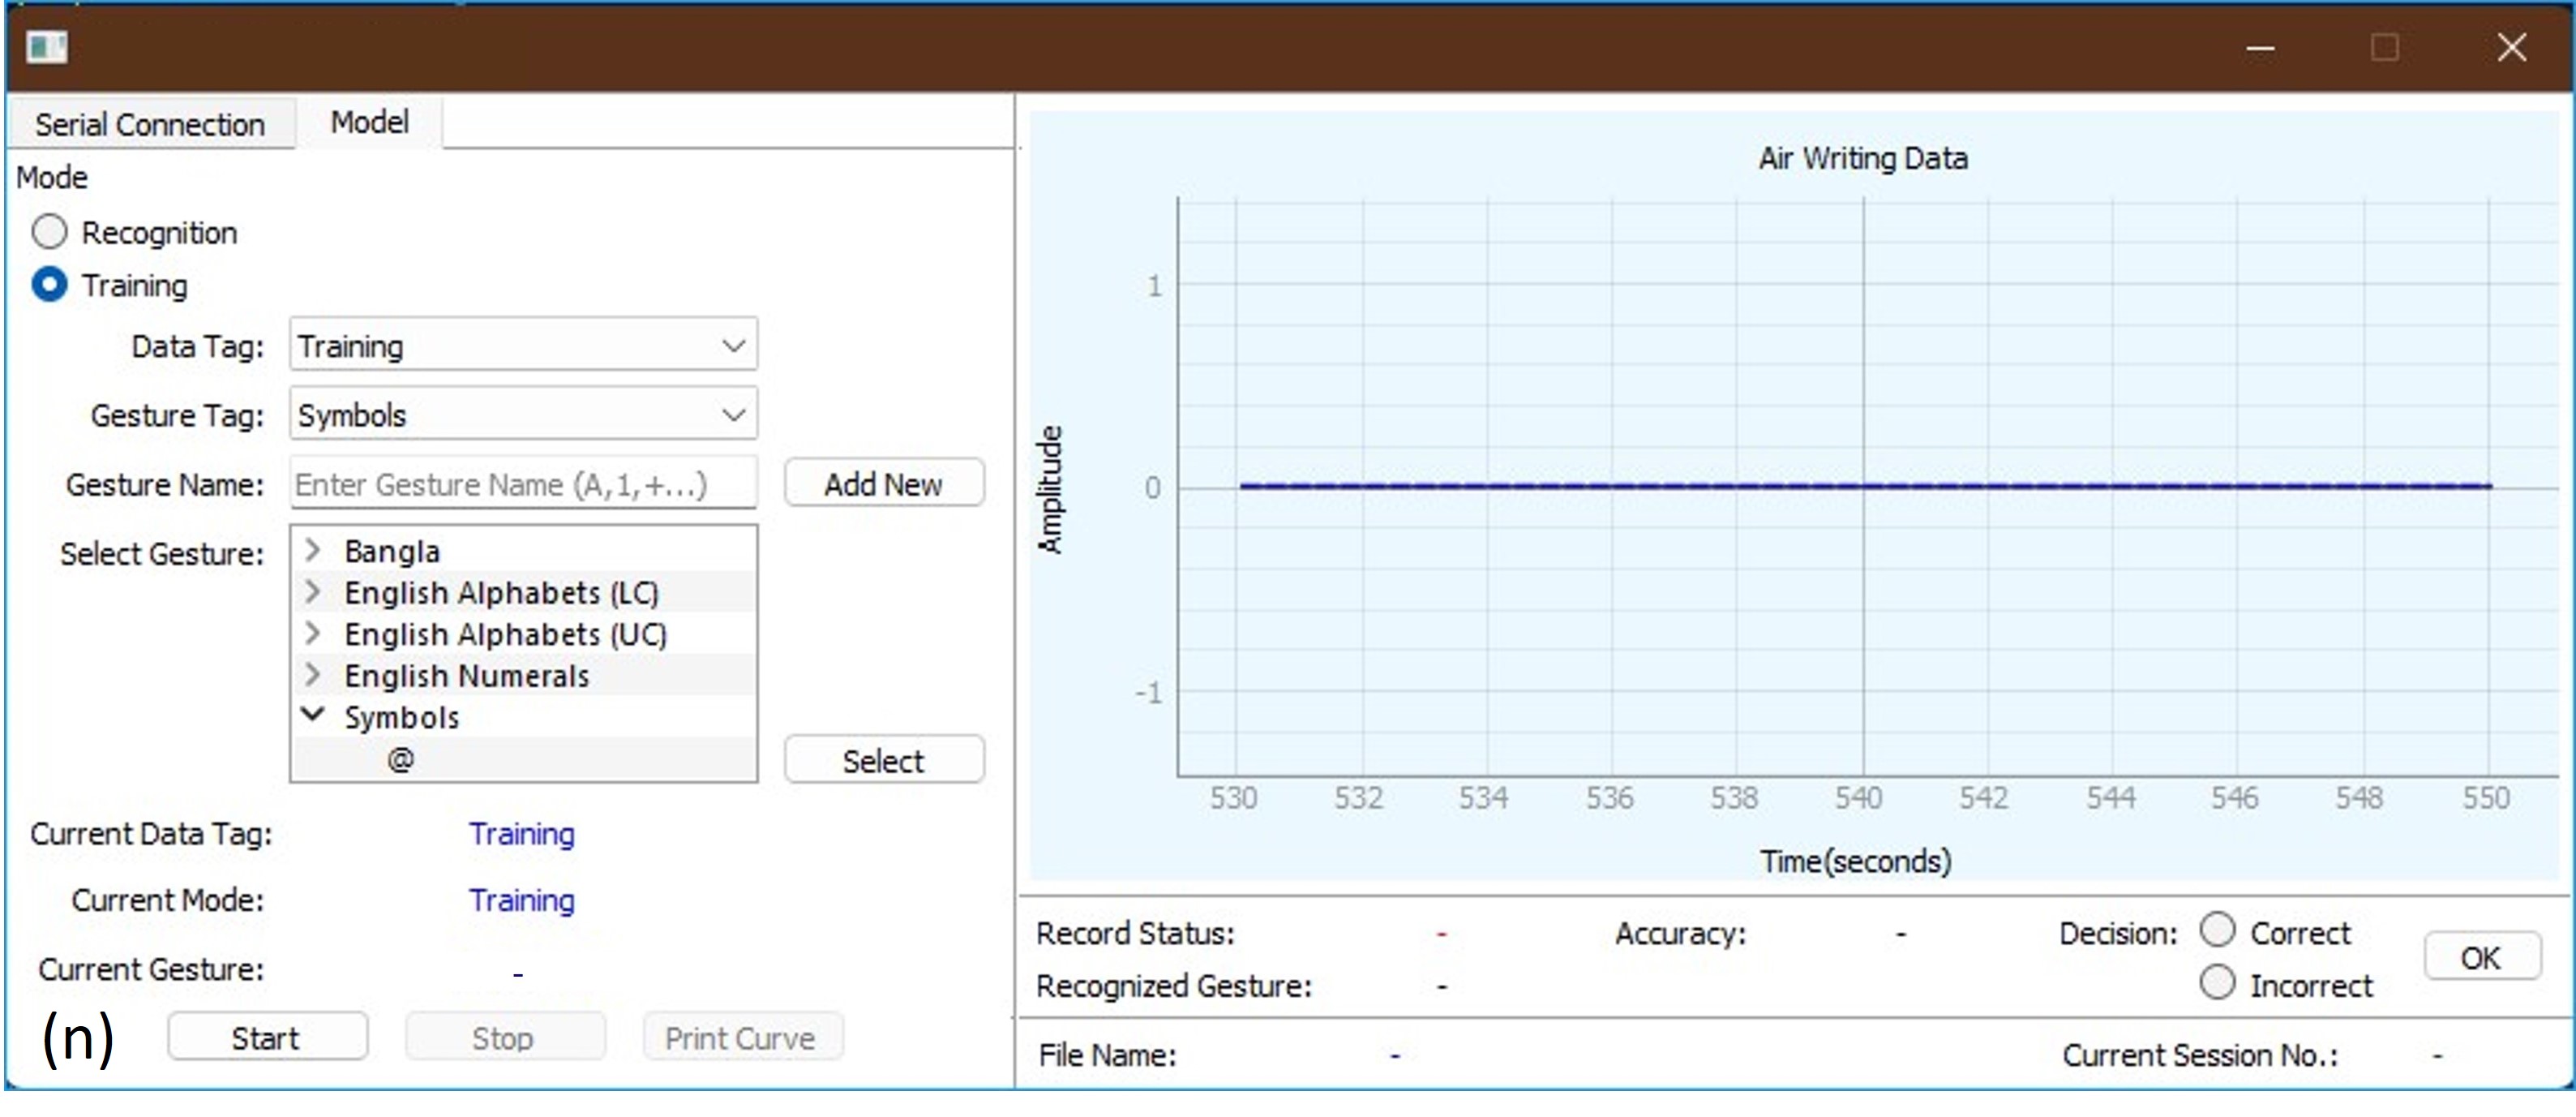
> @" [Figure (m)], and the list of existing
gestures under the "Symbols" tag is updated in
the "Select Gesture Field" [Figure (n)].
The functionalities of the "Recognition" mode on the other hand, are yet to be
implemented, however, the intended plan is to allow users to import pre-trained ML models
designed for ACR to test and and validate their performance. In the next section, we will
discuss about the process of recording data using the developed UI.
Using the UI to Record Hand Motion Data
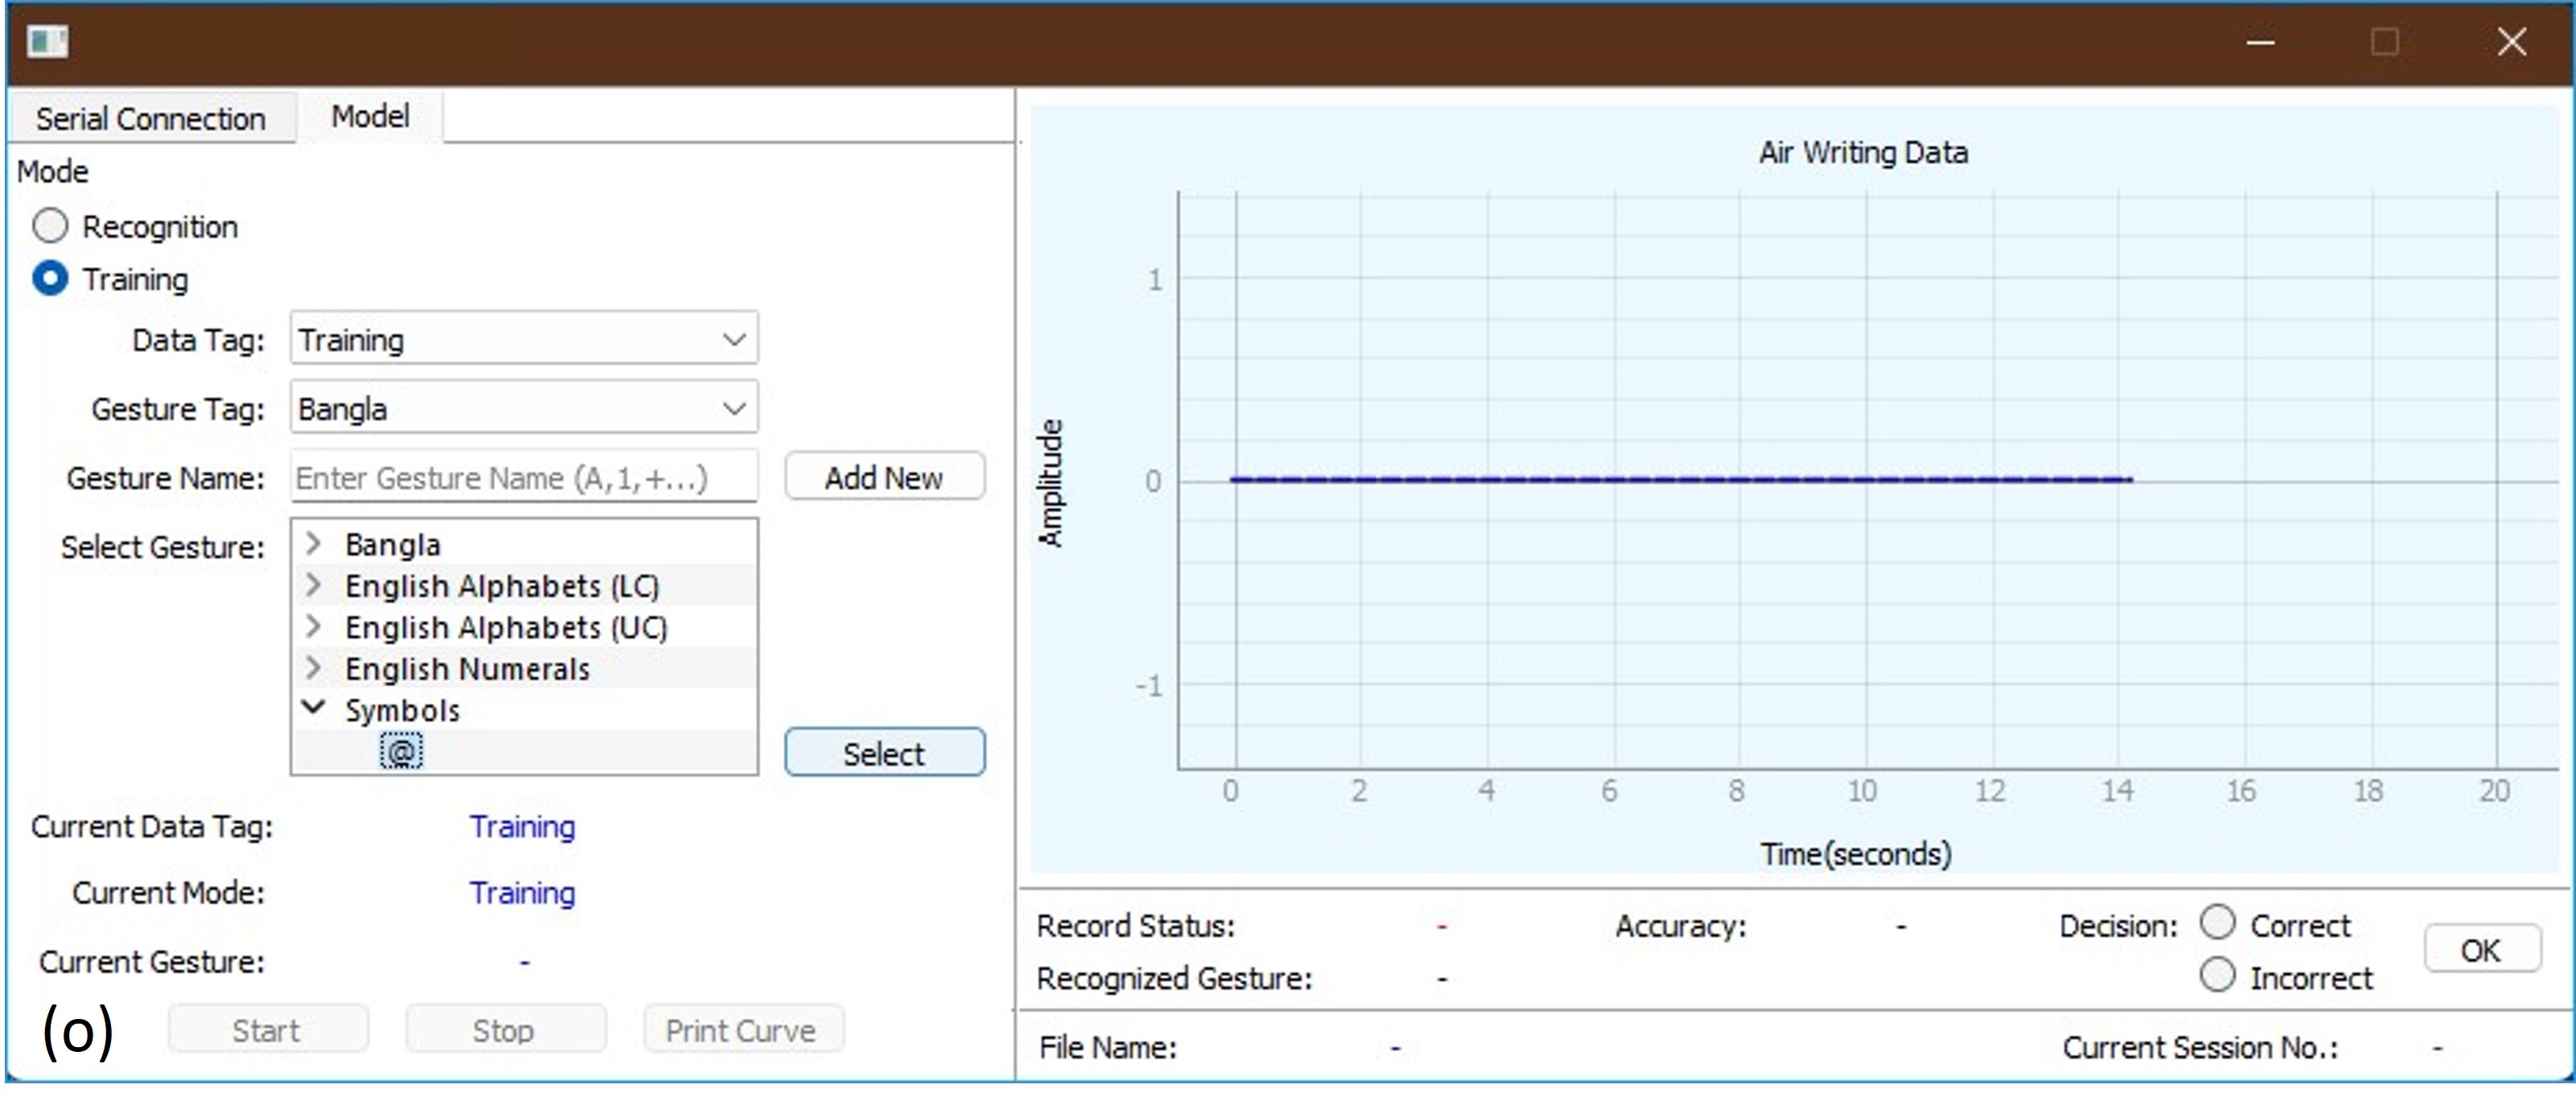
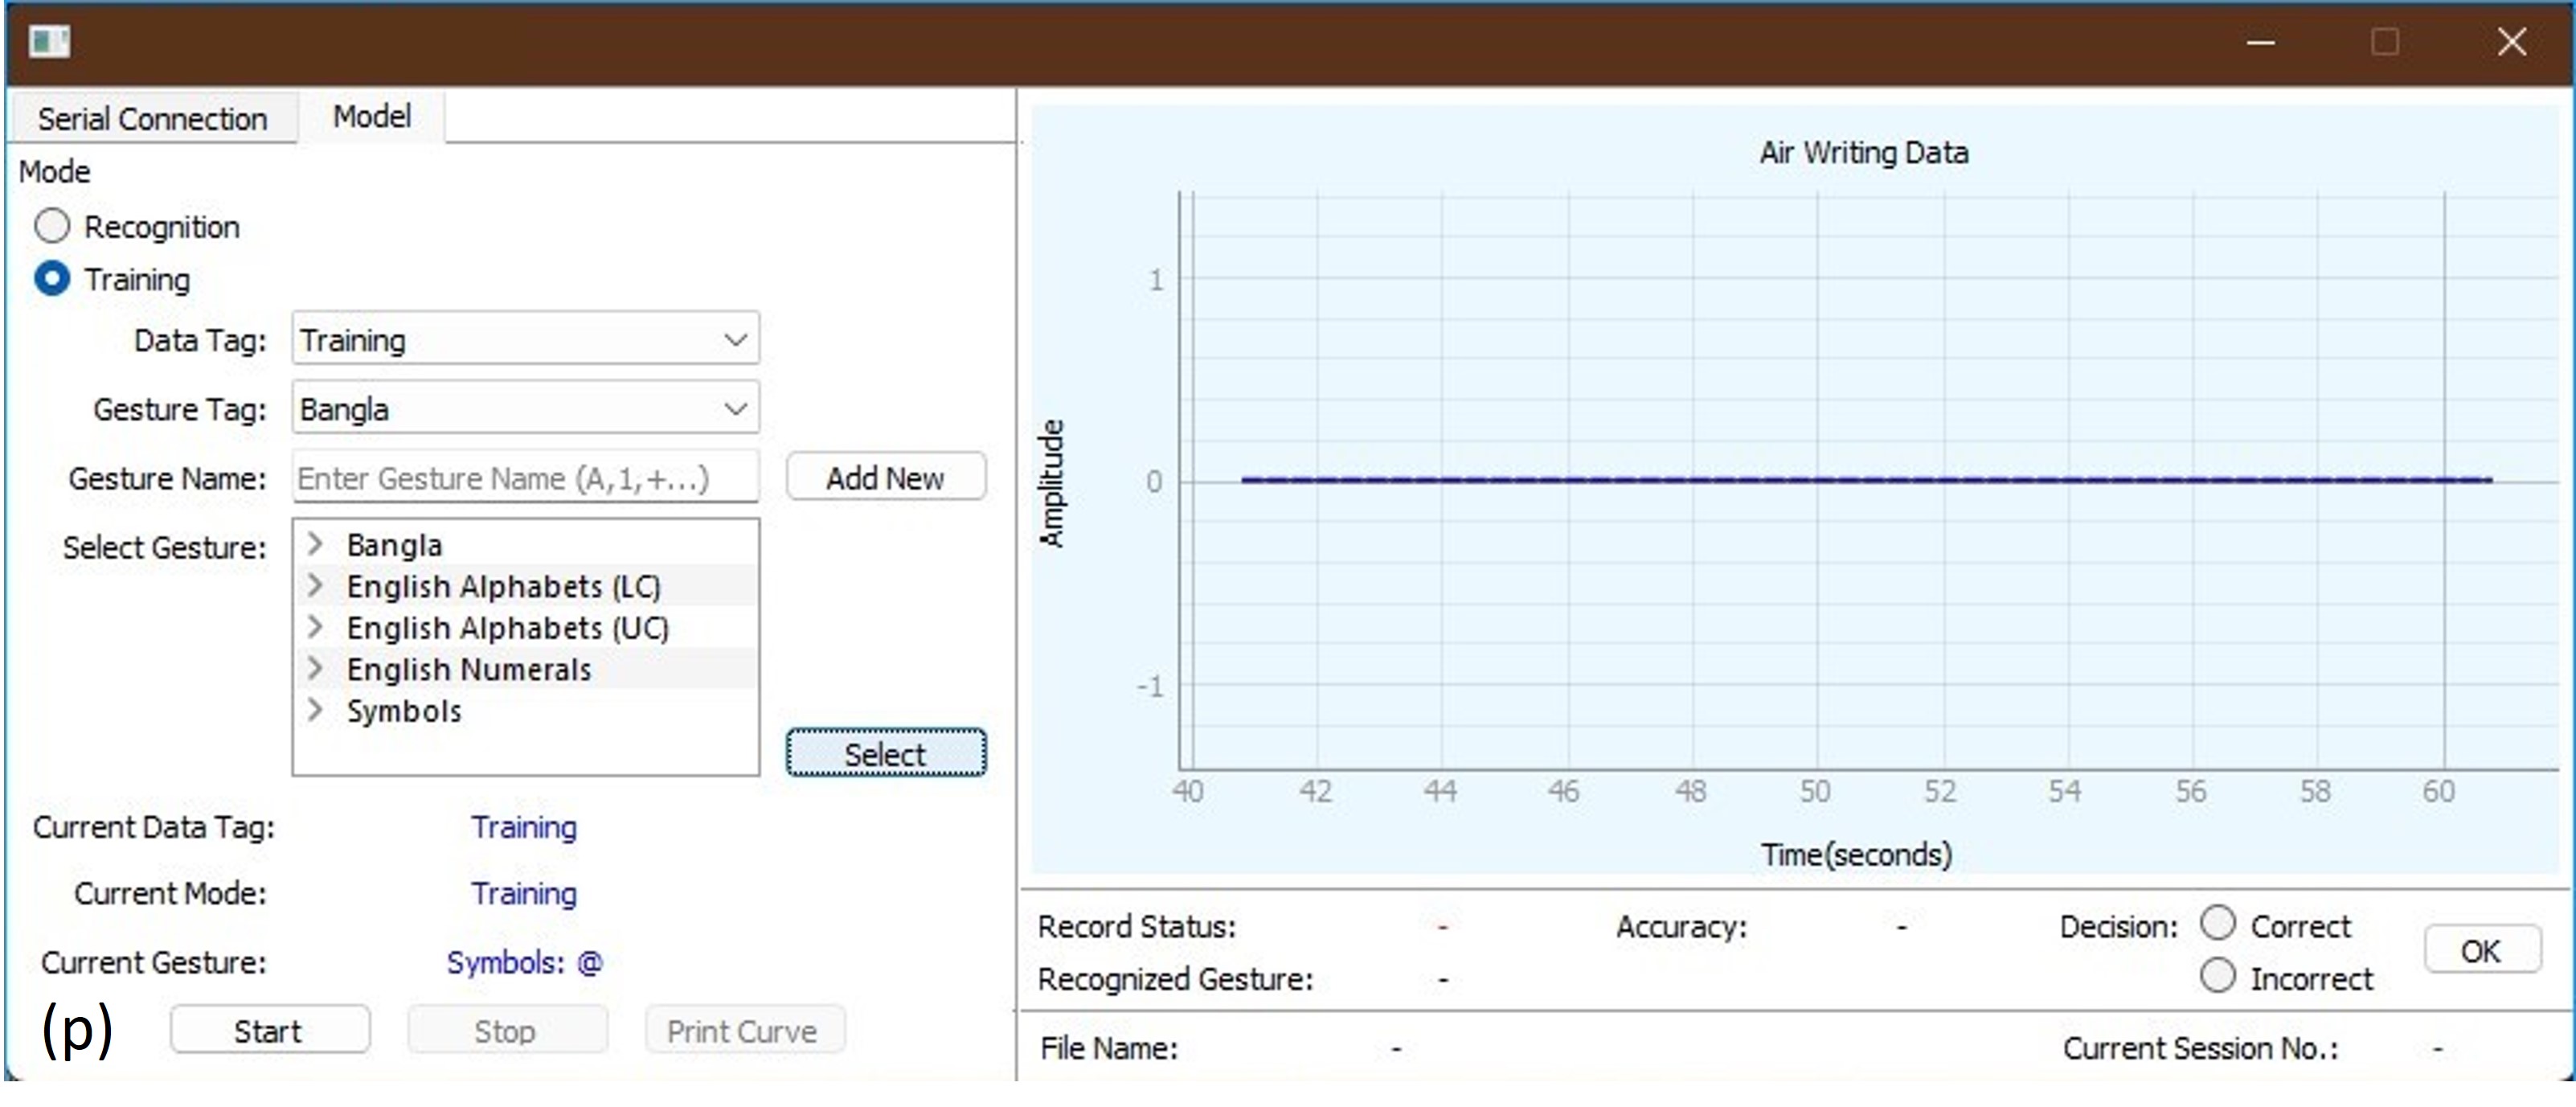
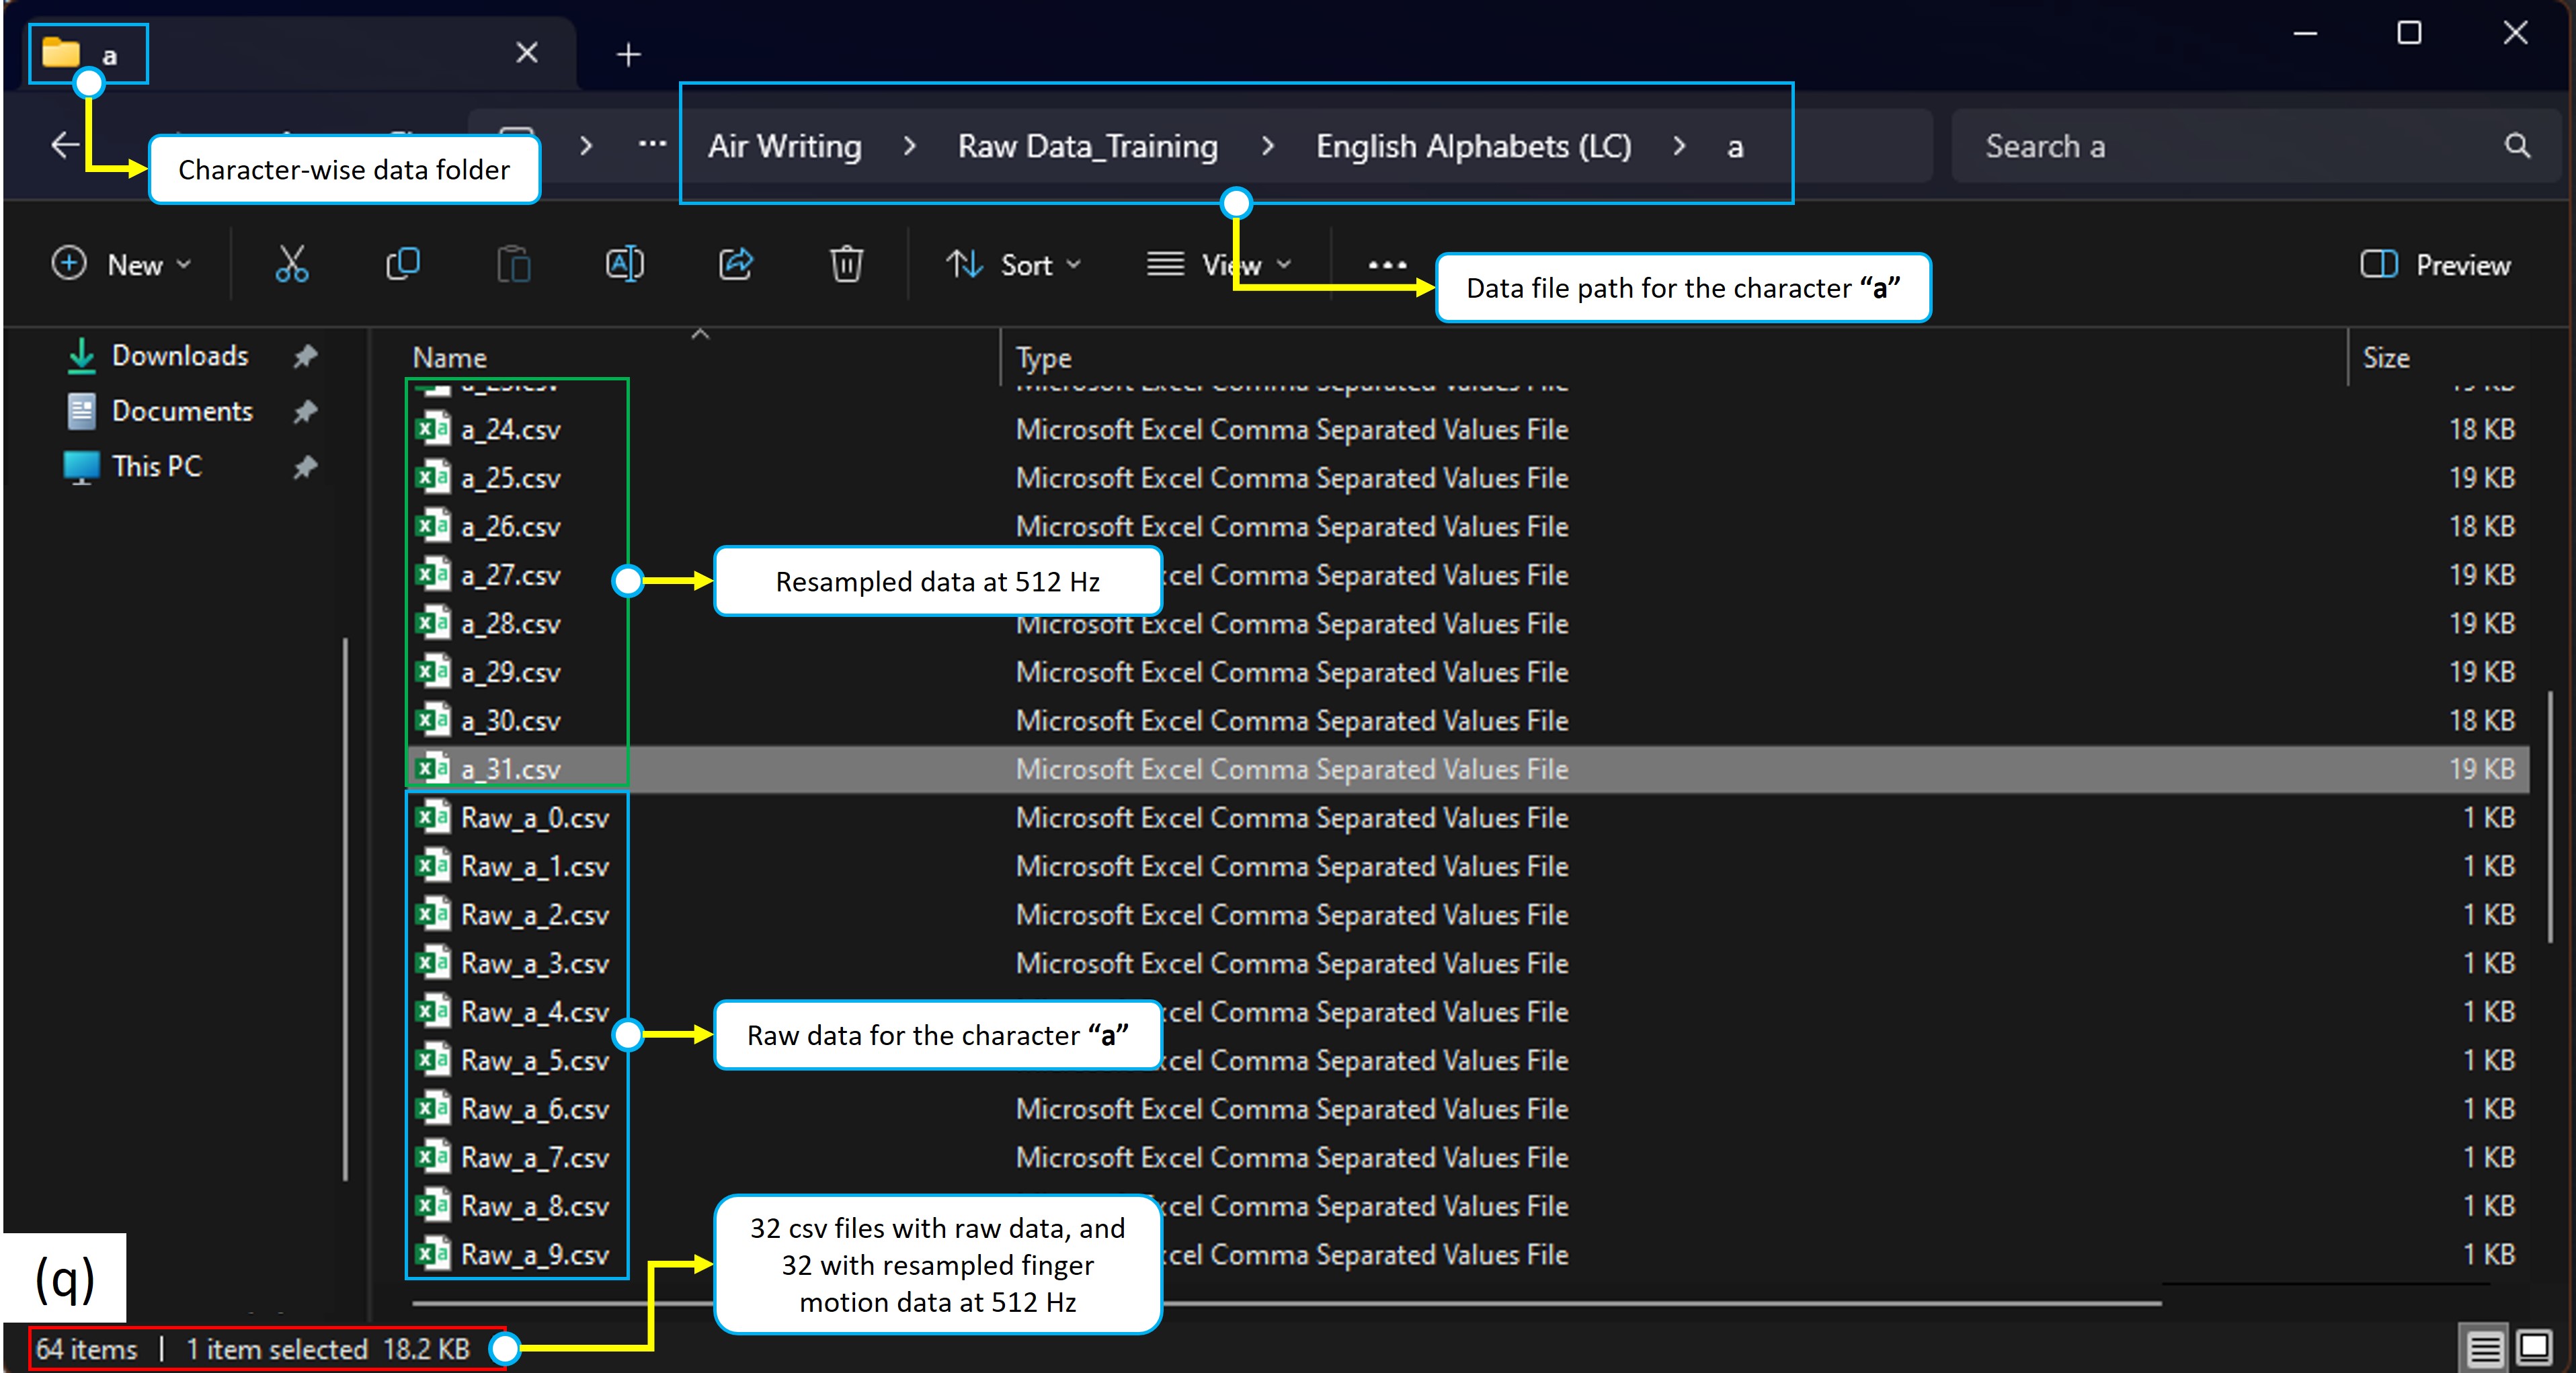
Continuing with our example in the previous section, to start collecting data for the character "@", the user simply has to click on the corresponding character from the "Select Gesture" combo box in the UI and click on the "Select" button [Figure (o)]. This will update the label, "Current Gesture" with the value, "Symbols: @" [Figure (p)]. At this stage, we are just a click away from recording the motion data. To start the recording session, the user then needs to click on the "Start" button, after which a new ".csv" file will be created following the naming convention, "<character_name>_<.csv file index>.csv". For example, the first file will be named as, "@_0.csv", the second as, "@_1.csv", and so on. This name will be displayed besides the label, "File Name", on the UI. At this moment the user while touching the recording touchpad [Figure (b)], can perform the desired gesture for air writing the symbol, "@". The value of the label, "Record Status", will be updated as "Recording" and the corresponding motion data will be appended to the file, "@_0.csv"(considering this as the current file name), until it is released. Upon release, the system will prompt the user with the message, "Do you want to save this response?", with the options "Save" or "Cancel". If the user wishes to save the file and clicks on the "Save" button, the file will be saved and filename will be updated to the next index. In the background, for each recording, the system stores two versions of the data, the first one being the raw data itself, saved as "Raw_@_0.csv", while the second one being the resampled data at 512Hz saved as "@.csv" [Figure (q) (example illustration for the character "a")].
It is to be noted that the "Start" button only activates the touchpad functionality for intiating data recording. After which the user may proceed to the next recording following the same process of performing the gesture while touching the touchpad. The user does not have to click on the "Start" or the "Stop" buttons in-between recordings. For example, if a user wants to record 10 gestures for the symbole "@", they will simple click on the "Start" button once at the beginning and perform 10 recordings by touching and releasing the touchpad. Finally, they can end the recording session by clicking on the "Stop" button after recording motion data of 10 gestures. The "Stop" button essentially deactivates the touchpad to prevent unintended data recording. To get a better idea of the recording process, we will have a look at a video demonstration in the next section.
System Demonstration
The device used in the video illustration above is just an earlier prototype of AirPen. The old version utilized similar sensors for motion capturing, with only the users needing to press a mechanical switch instead of simply touching a touchpad to initiate data recording. Few parameters are also missing from the UI in the video, as it is an earlier version. However, the process of recording data remains the same.